
Last Updated on October 22, 2023 by Kevin Chen
Battery-powered toys are fantastic for various reasons, but they can also be a headache to maintain, especially if you don’t take the time to do so while the toy is working properly due to damaged battery contacts.
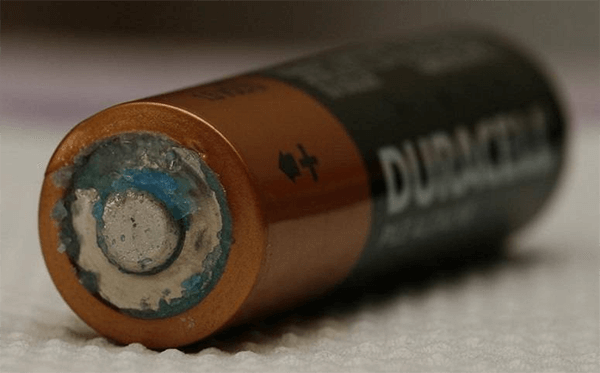
Corrosion is a natural thing that causes refined metals to change chemically into a more stable state. To put it another way, it’s a slow and steady process of metal oxidation induced by chemical reactions with the environment. Some people may find this a bit too complex, but it’s rather simple: metals will rust if left neglected.
What If I Told You?
Batteries were employed by the Parthian culture 2,000 years ago! They were used for electroplating items with gold or silver.
Toy batteries transmit electrical energy to the terminals, which allows the toy to function. However, when they corrode, a layer of debris forms between the battery and its terminals, blocking the current route and rendering the toy useless. If left ignored for a long time, this could also cause damage to the toy’s other electronic components. The terminals themselves are sometimes rusted and must be replaced.
Despite this, the toy can be saved by following a few simple procedures. So, rather than putting it in the garbage, here’s how to get it back up and run like new.
What causes battery corrosion in children’s toys?
To begin with, batteries contain an acidic or alkaline solution that is corrosive and can be quite damaging to the metallic connectors of toys and other electronic devices such as television remote controls.
Second, the solutions in these batteries are prone to leaking, which allows them to transmit current in the first place. This is most common when toys haven’t been played with within a long time or when batteries haven’t been changed in a long period.
What Causes Batteries to Leak?
The fact that batteries discharge is the main cause of these leaks. This phenomenon has certain scientific underpinnings, and you must understand how it works.
The chemistry of the batteries changes with time, resulting in hydrogen gas production. Because batteries are air-tight, the gas has a hard time escaping as the battery continues to create hydrogen.
As a result, the battery casing swells from the inside, putting great strain on it. This pressure ruptures the insulating shell at the ends or the external metal canister, allowing the gas and the battery’s liquid to escape. Corrosion of the terminals results from this seeping solution.
What Causes Battery Corrosion?
Before we clean battery terminals in toys, we need to figure out what’s causing the problem. Some of the most prevalent reasons include:
- Do not remove the batteries when keeping the toy for an extended time.
- Keeping the device in a wet location.
- Experiencing extremes of heat or cold.
- Using various brands, ages, and types of batteries.
- Using or failing to examine batteries for harm before use if they have previously been damaged.
- Trying to recharge a non-rechargeable battery.
- Humidity-induced corrosion of the battery shell might cause chemicals to flow out, causing damage to the terminals and equipment.
- The accumulation of hydrogen gas inside the battery will cause a leak and subsequent corrosion by breaking the exterior casing or insulating seals.
The factors mentioned above are commonly responsible for your child’s toy becoming unusable. As a result, make sure you don’t fall into any of the above categories and check the battery contact at least once every few months.
How to Clean Battery Corrosion in Toys
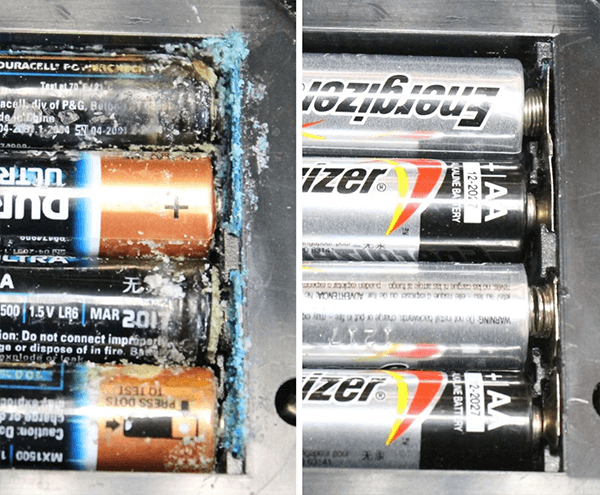
When either the external metal canister or the insulating case is broken, the solution begins to flow out of the toy chambers used to hold the batteries. The acid/alkali can damage the terminals if not halted quickly enough, impeding power transmission from the battery to the toy’s other electronic parts. You must carefully remove the corrosion if you want the toy to be usable again.
However, please proceed with caution because the battery solution can be hazardous to anything in its path, including you. When eliminating this corrosion, take precautions because any touch with the acid or alkali might cause skin harm. If you proceed with caution, removing this erosion is simple and safe.
Cleaning the battery terminals on toys, like most DIY projects, necessitates a step-by-step tutorial as well as specialized materials and tools. There are various effective approaches at your disposal; we’ll focus on the one that’s simple to implement.
Using Vinegar or Baking Soda
When it comes to the components you’ll need, this method is one of the most economical. The following are some of them:
- Vinegar or baking soda
- Cotton swabs or paper towel
- Rubbing alcohol
- Wire brush
- Protective gloves and glasses
- Toothbrush
- Foil made of aluminum (optional)
The first step is to remove the batteries from the plastic cradle once you’ve assembled all of the necessary components. If you can’t get the batteries out for any reason, pry them out with a screwdriver or, in the worst-case scenario, dump Coca-Cola on the terminal. Remember that Coca-Cola is measured in drops, so don’t drink too much of it.
After removing the batteries, use a toothbrush to apply vinegar (or baking soda) to the corroded terminal. Remove any debris or rust with a paper towel.
You’ll likely hear some fizzing, but that’s simply the solution and corrosion reacting chemically. Allow a few minutes before using a cotton swab to remove any remaining residue. Use the wire brush to rub the stubborn corroded leads if you encounter any problems. Before replacing the batteries, allow them to thoroughly dry.
You’ve completed the task!
The recommended steps on how to clean battery terminals on toys
Put your gloves on before doing anything else. The primary reason for this is that battery corrosion is caused by strong chemicals that are extremely damaging to the skin. You should avoid coming into touch with the solution since serious skin burns will almost certainly result.
Use a screwdriver or a dull knife to remove the corrosion off the battery terminals. This necessitates prudence, as any haste could result in damaged terminals or a compromised battery exterior. In this scenario, a dull knife is suggested to avoid self-inflicted injuries that a sharp knife might easily cause.
Once the batteries have been removed, dispose of them safely. You should also clean the corrosion from the screwdriver or dull knife, depending on which one you used.
Using the piece of cloth, gently wipe away the dried rust in the toy battery compartment.
The cloth should next be dipped in white vinegar. Rub the battery compartments, including the terminals, gently with a cloth. Don’t be concerned if you hear a fizzing sound. This is typical; it has to do with the fact that the solution used has a different PH than the battery’s alkaline content.
Cotton swabs or balls can be used when the battery compartments are small, which is frequently the case with smaller toys. Extreme caution should be exercised during the cleaning process to ensure no liquid leaks back into the toy.
Clean the whole compartment, including the terminals, with a clean cloth, dipped in clean water after removing the corrosion. Before using, wipe the compartment, including the terminals, with a soft dry cloth and dry naturally in the air. Because of the high temperature, sun drying is not recommended.
Other Approaches to Cleaning Toy Battery Terminals
The principle of most cleaning methods is the same, but the components aren’t. For example, you should use vinegar or lemon juice to clean an alkaline battery toy. B baking soda and water are better options if acidic batteries power the toy.
You can use less aggressive treatments such as rubbing alcohol, depending on the severity of the corrosion. Rubbing alcohol should be sufficient if the leads begin to corrode and minor damage. This is only true if you spot it early on, which is why it’s crucial to inspect your child’s toys periodically.
Other Useful Hints and Techniques to Consider Applying
Humid environments are the number one enemy of your child’s battery-powered toys. When there’s a chance of moisture, there’s a chance of rusting. Furthermore, poor-quality batteries are a common cause of corroded terminals.
While it may appear to be an extra expense, you should always seek to get grade-A batteries, or the toy will be destroyed before the batteries are ever installed.
Dispose of old batteries as soon as possible. It’s never a good idea to reuse batteries that have already been used and have corroded leads, regardless of how undamaged or healthy they appear. If one battery leaks over the other, discard both; it’s not always worth the risk of learning how to clean toy battery terminals every time they fail.
Conclusion
Contrary to popular belief, battery corrosion in toys is usually repairable.
You can repair your toy, TV remote, or even a flashlight with corroded batteries with these simple procedures. Never contact the corroded materials in and around the battery compartment with your bare hands, as this could result in burns or illness. Avoid any eye or gastrointestinal contact with the corroded substance. I hope you found this post useful and that you now understand how to clean battery terminals on toys.
Lastly, for more information, contact us at ICRFQ; we are the best electrical components manufacturers in China.
If you want to find more Electronic Components Distributors, please check out the following articles:
Electronic Components Distributors In the USA
Electronic Components Distributors In UK
Electronic Components Distributors In China
Electronic Components Distributors In India
Electronic Components Distributors In Singapore
Electronic Components Distributors In Malaysia
Electronic Components Distributors In Vietnam
Electronic Components Distributors In South Korea
- Where to buy IC chips? The Best Guide? - March 26, 2024
- Breaking Down Barriers: Overcoming Obstacles in Cross-Border Electronic Component Trade - March 4, 2024
- Everything You Need to Know About Amplifier IC Chips - March 4, 2024


