
Last Updated on October 22, 2023 by Kevin Chen
If you are an engineer, you will always want to get the most accurate readings. Whether you work in manufacturing, construction, mechanical, or any other industry. Micrometers are among the pieces of equipment that are used for making such precise measurements.
How do I interpret the values on the micrometers? Well, this is the exact question that we are going to answer in this article.
What is a micrometer?
First things first, let’s define what a micrometer is. A micrometer is a measuring instrument used in various fields from medicine to mechanical engineering. It is an instrument used for taking accurate measurements.
How does it work?
It works on the principle of the screw. The reading is taken by adjusting the screw at the top of the equipment and it moves along a graduated scale on its shaft.
This graduated scale has a number of lines that represent units of measurement. These units are given by the manufacturer during purchase and this can vary depending on your requirement.
Unlike other measuring equipment, micrometers have vernier scales that help you read more accurately while taking measurements in smaller increments than those given by graduations on the main scale.
Components of a micrometer
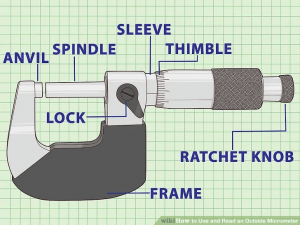
Image credit: wikihow.com
To give you a deeper understanding of how a micrometer works, it will be prudent to analyze its parts and components.
A micrometer has two parts: The spindle and the thimble
The spindle is the body of the micrometer, which has a screw thread on its top. The thimble is also called a sleeve and it is usually made of metal or plastic.
The spindle has a hole in its bottom to allow it to be placed on a small rod called a spindle rod, which is used to turn the spindle. The sleeve or thimble fits over this hole and holds the spindle in place while allowing movement along its axis. It also has an aperture that allows the user to see through it while taking measurements.
It is equipped with an adjustable screw at its top whose purpose is to move the thimble along its axis and take measurements as required. The screw is equipped with a scale that reads in either millimeters or inches, depending on the type of micrometer you have.
The spindle is also equipped with a locking screw which can be used to lock the spindle at any point along its axis so that measurements can be taken at various points along the spindle’s length.
Anvil is another key part of a micrometer.
The anvil is usually made of metal or plastic and it is the part that touches the object being measured. It also has a hole in its center which allows the spindle to be placed on it so that measurements can be taken.
The anvil is equipped with a scale that reads in either millimeters or inches depending on the type of micrometer you have and it too is equipped with a locking screw which can be used to lock the anvil at any point along its axis so that measurements can be taken at various points along its length.
A ratchet screw is a screw that has a small ratchet mechanism attached to it. The ratchet screw is used to lock the spindle at various points along its length so that measurements can be taken at various points along the spindle’s axis.
A depth stop is essentially a rod with a spring attached at one end. The purpose of this device is to limit the depth of travel of the anvil along its axis as you take measurements to ensure that you do not damage the object being measured.
A depth ring is essentially a ring with numbers engraved on it and markings on its outer edge which are used to accurately measure depth. It is placed on the anvil so that it can be used for measuring depths only.
How to reading a micrometer
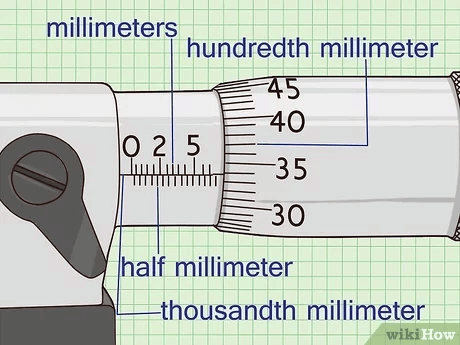
Image credit:wikihow.com
Now that you know the technical components of a micrometer, let’s dive straight into how to read their values.
Reading a micrometer can be quite a technical process. But with these tips, you will be able to extract accurate values from the device.
We will look at three main methods of reading a micrometer.
Method 1: Measuring using a micrometer
Step 1: Set the micrometer to zero
Turn the spindle until it is at the 0 position. This is where the spindle and anvil are aligned.
Step 2: Set the micrometer to read a value less than zero (in this case, -0.05mm)
Step 3: Place the object that you want to measure between the anvil and spindle. Make sure that you place it such that there is no gap between the two components of your micrometer.
Step 4: Turn the screw until you feel resistance against it, this indicates that you will be able to start taking measurements from here onwards. This resistance is a result of friction between the object and anvils.
Step 5: Turn the screw until you feel that there is no more resistance. This means that you have reached the end of your object. Note that it may be a while before you get to this point, so don’t panic if you don’t reach it immediately.
Step 6: Read the micrometer as follows:
If the anvils are longer than the spindle, then read from the anvil to zero (0). For example, if you are measuring -0.25mm, then read 0-25. If the spindle is longer than the anvils, then read from zero to the spindle. For example, if your measurement is -0.25mm, then read 0-25.
Step 7: Repeat steps 3-6 until you have taken all the measurements that you need.
Step 8: Clean your micrometer, and store it in a safe, dry place.
The above procedure is for a dial micrometer. If you are using a digital one, then it is likely that the procedures will be different.

Method 2: Reading an inch micrometer
This method is ideal when you want to record the readings in inches.
Step 1: Set your micrometer to give you measurements in one-thousandth of an inch. In the decimal form, the readings will be .0001.
Step 3: Read the whole number as it is on the sleeve. The number on the sleeve is the decimal equivalent of the whole number. For example, if you are measuring .004, then read 5.
Step 4: Read the fractional part as it is on the sleeve. The fractional part of your measurement is equal to 1/1000th of your measurement (e.g., 1/1000th of .004 or 0.0004).
Method 3: Reading a metric micrometer

Image credit:wikihow.com
This method is ideal when you want to record the readings in millimeters.
Step 1: Set your micrometer to give you measurements in tenths of a millimeter. In the decimal form, the readings will be .001.
Step 2: Read the whole number as it is on the sleeve. The number on the sleeve is the decimal equivalent of your measurement (e.g., .002).
Step 3: Read the fractional part as it is on the sleeve. The fractional part of your measurement is equal to 10/100ths of your measurement (e.g., 10/100ths of .002 or 0.002).
How to improve the accuracy of micrometer reading
At this point, you have learned different techniques of getting micrometer readings. You must have become very familiar with the concepts and the best way to improve the accuracy of micrometer reading.
The most important thing to improve the accuracy of micrometer reading is to check and calibrate your micrometers at regular intervals. This is done by using calibration weights (approximate 1 gram) or by using a special setting tool. The calibration process involves placing the micrometer in an adjustable vise, adjusting it, and then checking it again. The process should be repeated at least once a year.
If you are using a digital caliper when performing calibration, you can use its built-in features such as zeroing, setting the zero point, and keeping the zero for subsequent measurements. However, if you are using a dial caliper, you need to set the zero point manually. This is done by placing the caliper on a flat surface and then turning it until there is no play in the wheel (needle).
You must also calibrate your micrometers with different thicknesses of wood or metal. It is always recommended that you use stainless steel or brass for calibration. These metals are not magnetic and will not affect your measurements.
If the accuracy of your micrometer is <0.01mm, then your measurements will be inaccurate because of the inability to measure accurately enough small parts.
Conclusion
I hope the article has enriched you with knowledge on how to read micrometers. Just remember that there is no substitute for experience and that you must have a good level of skill before using any type of micrometer.
And in case you are considering buying digital micrometers, let us be your plug. At ICRFQ, we are a sourcing agent for micrometers in China. We can also provide you with the best quality digital micrometer in China. If you are interested in our service, please contact us and we will be glad to serve you.
If you want to find more Electronic Components Distributors, please check out the following articles:
Electronic Components Distributors In the USA
Electronic Components Distributors In UK
Electronic Components Distributors In China
Electronic Components Distributors In India
Electronic Components Distributors In Singapore
Electronic Components Distributors In Malaysia
Electronic Components Distributors In Vietnam
Electronic Components Distributors In South Korea
- Where to buy IC chips? The Best Guide? - March 26, 2024
- Breaking Down Barriers: Overcoming Obstacles in Cross-Border Electronic Component Trade - March 4, 2024
- Everything You Need to Know About Amplifier IC Chips - March 4, 2024


