
Last Updated on October 22, 2023 by Kevin Chen
It’s more crucial than ever to learn how to solder wires. Homeowners are increasingly repairing appliances such as dishwashers and refrigerators. You can fix minor equipment like electric teapots instead of throwing them away when you know how to solder. With a little discipline, patience, and practice, you can learn how to solder wires for repairs and entertaining projects.
Let’s look at the steps involved in soldering two wires together—or three or more if necessary.
Before You Begin
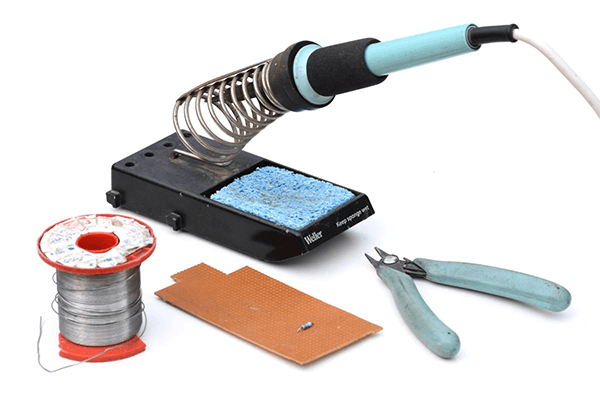
You might buy a soldering iron station that contains a soldering iron, stand, and tip cleaner instead of buying individual soldering components. The soldering iron cord is less stressed because the complete station plugs into an outlet. This is necessary for the delicate hand movements required for soldering.
Soldering has long been done with leaded 60/40 solder, consisting of 60% tin and 40% lead. If handled properly, it is completely safe. Choose lead-free solder, made up of 99.3% tin and 0.7 percent copper, for maximum safety.
If you’re working with lead-based solder, ensure your workspace is well-ventilated. Work on a non-flammable surface since soldering iron tips can reach 600 to 800 degrees Fahrenheit, and molten solder can drip. If you’re working with lead-based solders, properly wash your hands afterward. Wear safety glasses anytime dealing with solder, regardless of the type.
How to Solder Wires Together Correctly
Anyone working or experimenting with electronics should be able to solder. Soldering properly requires practice, patience, and perseverance, but this tutorial should help you get started. This article explains the correct soldering technique and safety considerations, which are critical for beginners. Solder is a metallic “glue” connecting the pieces and allowing electrical current to pass.
Anyone who solders frequently understand the importance of taking the proper precautions before proceeding. Eye protection and suitable clothes (i.e., not shorts and a sleeveless shirt) should be worn when soldering because liquid solder can drip and pop. Because soldering emits dangerous vapors, you should also have an exhaust fan at your workstation.
A decent soldering iron is the first item you’ll need. Soldering irons can be found in most hardware stores or on the internet. Soldering electrical components requires a soldering iron with a power range of 15 to 40 watts or one with temperature control. Soldering tips range from screwdriver, wedge, and flat tips to pencil, cone, and precision tips and come in various shapes and sizes. Select a small tip to maneuver around the board and components with ease.
The process is the same, whether you’re soldering a header, connector, or wires directly to the board. It is, nevertheless, easier to the tin wire before soldering.
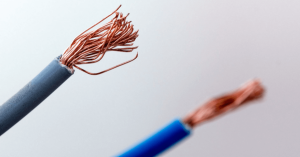
Step 1: Prepare Your Wires
Multi-filament wires that have been freshly stripped require considerable attention before being soldered. The filaments should be twisted together or pigtailed to keep each wire organized and function more like a single unit. At this time, I also like to apply some soldering resin to the filaments. When tinning the wires, it significantly helps the solder flow. Although it’s still beneficial, this step isn’t necessary if you’re using flux core solder.
Step 2: Tin Your Wires
The following step of soldering the splice will be easier if you tin the wires (melt some solder into the filaments with your soldering iron) before joining them. Because you don’t have to spread as much solder around afterward, it helps distribute the heat rapidly, and the pieces require heat for a much shorter time. When soldering to a circuit board or a component itself, this decreases the chances of melting through the wire shielding near the splice or damaging neighboring components.
You want the solder to be evenly distributed between the filaments, but not so much that it swallows the filaments.
Step 3: Mechanically Join Your Wires
Before soldering, the wires should be wrapped around each other to prevent them from pulling apart. If the wires are pulled on, it will no longer be the solder holding things together. The essential role of solder is to conduct electricity, not bind objects together (though it certainly does help with that too).
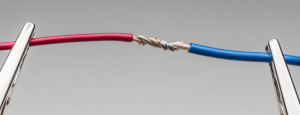
Wrap one wire around the other, making sure there is enough metal exposed above the sheath for the second wire to wrap around. The wrap’s turns should not overlap and sit close to the other. Make sure your wraps are neat.
Unfortunately, your second or third wrap can be a disaster. Having a bad example to criticize should teach you something, right?
Step 4: Position the Wires
Place the wires so that they are higher than the work surface. A soldier may adhere to wires that rest flat on the surface. If necessary, alligator clips or even home metal spring clamps can be used to raise the wires.
Step 5: Add the Rosin Flux
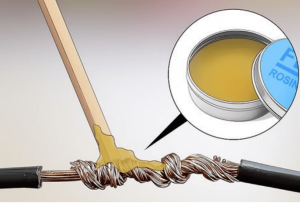
Apply a little amount of rosin flux paste to the linked wires, rubbing it in gently to cover all of the copper. The rosin flux will aid in attracting the solder to the mesh strands.
Step 6: Prepare for Soldering
Connect the soldering iron and turn it on. Unroll roughly six inches of solder to expose the end, now ready to use.
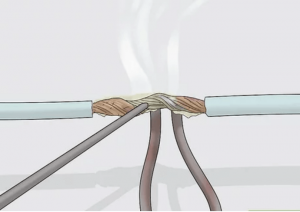
Step 7: Soldering the Wires
Soldering wires together is normally simplest with a broad soldering iron tip, as this provides a vast surface area to heat your wires. You can use rosin flux to improve the adherence of your solder to the wires, but we find that this isn’t necessary with the wires we’re using.
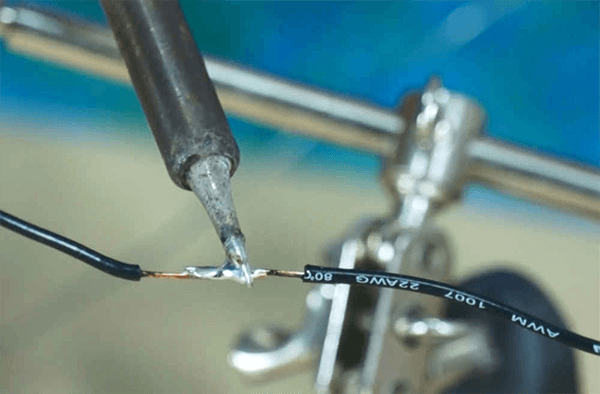
Heat the exposed wires by pressing your soldering iron tip into them for a few seconds. Once hot, start feeding solder into the connection between your wires, being careful not to let the solder sink into the wires as it melts. You may need to spin your wires once or twice to achieve an even distribution.
Step 8: Heating the Heat-Shrink Tubing
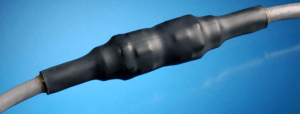
After you’ve finished soldering, it’s time to put the finishing touches on your project. Place the heat-shrink tubing over the joint you just made before using the heat gun to seal it to the wires. Your wires should now be perfectly soldered and protected.
Soldering solid wire to stranded wire
- Soldering stranded wire to solid wire takes a little longer than soldering stranded wire to stranded wire or solid wire to solid wire.
- When soldering stranded wire to solid wire, keep the following in mind:
- Remove around 2″ (5 cm) of insulation from both wires and use solid wire exclusively. It loses its suppleness when you tin stranded wire and becomes more rigid.
- Wrap the stranded wire five or six times around the solid wire strip (stranded wire is more flexible than solid wire).
- Return the solid wire to its original shape.
- Apply a drop of solder flux on top of the wire connection and cut the surplus solid wire at the place where the first stranded twist begins.
- Solder wires with the tip of a soldering iron at the top of the connector.
- Apply heat to the heat shrink tube and the junction using a heat gun.

Stranded wire to stranded wire soldering
Remove roughly 5/8 of an inch (1.60 cm) of insulation on both wires. Half an inch is the recommended length for a soldered connection component. The remaining striped wire creates a space between the soldered connection and the insulation.
- Any stray strand of stranded wire should not be severed because it will reduce the wire’s conductivity.
- Finger-twist the wires numerous times.
- Apply a little amount of rosin flux on the upper side of the connection. When heated, the flux transforms from a solid to a liquid, allowing it to flow freely over the solder joint due to gravity. At a lower temperature than the solder, the flux melts.
- Connect the exposed connections with a soldering iron.
- Apply some solder after a few seconds. The solder should be applied to the whole junction between two wires.
- Take the soldering iron out of the equation.
- Using a heat-shrink tube, seal the connection.
The mesh splice technique is another approach to connecting two stranded wires. You should make the following connections:
- Remove around 5/8″ (1.60 cm) of insulation from both wires • Place a piece of heat shrink tubing on one of the wires • Connect stranded wires
- Use a little quantity of solder flux on the joint. When too much flux is used, an undesired process occurs. Liquid solder will only flow as far as the flux will allow, resulting in undesirable capillary action.
- Solder wires with a soldering iron on exposed connections. • Slide the heat shrink tube over the junction and heat using a heat gun.
Conclusion
Soldering is the process of melting a low-temperature metal alloy over a joint or wire splice to keep two pieces together without them breaking apart. If you want to connect two wires, solder can be used to produce a long-lasting connection.
While soldering has many complexities, it’s nice to look back on a completed electrical project and know it’s working properly. You spent the time learning a new skill to complete your project correctly. We hope that this article will help you
Lastly for more details on solder wiring, contact us at ICRFQ, we manufacture the best electrical components in China.
If you want to find more Electronic Components Distributors, please check out the following articles:
Electronic Components Distributors In the USA
Electronic Components Distributors In UK
Electronic Components Distributors In China
Electronic Components Distributors In India
Electronic Components Distributors In Singapore
Electronic Components Distributors In Malaysia
Electronic Components Distributors In Vietnam
Electronic Components Distributors In South Korea
- Where to buy IC chips? The Best Guide? - March 26, 2024
- Breaking Down Barriers: Overcoming Obstacles in Cross-Border Electronic Component Trade - March 4, 2024
- Everything You Need to Know About Amplifier IC Chips - March 4, 2024


