
Last Updated on October 22, 2023 by Kevin Chen
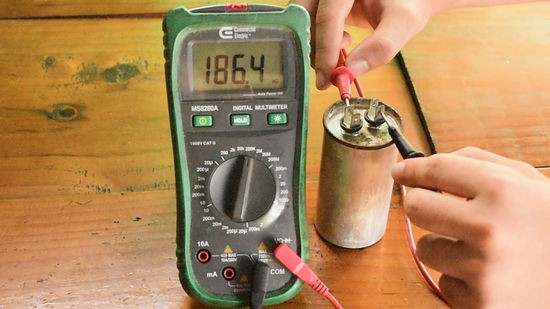
Image source WikiHow
How do I check an AC capacitor? This is a question that you are likely to ask yourself. Well, there are a few different ways to check an AC capacitor. And this is the primary goal of this article.
We are going to discuss the various methods of testing an AC capacitor, and the different tools you need to do so.
At the end of this guide, you will be able to handle all these steps, whether you are a professional electrician or an enthusiast.
What is an AC Capacitor?
First things first, let’sstart by knowing what an AC capacitor is. An AC capacitor is an electrical component that is used in AC (alternating current) circuits to store electrical energy in an electric field. It consists of two metal plates separated by an insulating material called a dielectric. The AC capacitor stores the energy in the form of an electric field between the plates. The capacitor can then be discharged to provide a current flow when needed.
AC capacitors are commonly used to filter out noise in AC circuits, to smooth out voltage and current fluctuations, and to provide starting torque for motors.
How is the AC capacitor different from the DC capacitor?
The AC capacitor is designed to store energy in an electric field which is constantly alternating in polarity, whereas the DC capacitor is designed to store energy in an electric field that is static in polarity.
AC capacitors are used in AC circuits because the electric field needs to switch between positive and negative in order to function properly. DC capacitors are used in DC circuits, where the electric field remains constant in polarity.
Methods of testing AC Capacitors
There are numerous methods of testing AC capacitors. Let’s discuss each of them and you will choose the best.
Method 1: Test the capacitor using a digital multimeter- Resistance mode
Test capacitor using a digital multimeter- Resistance mode In this method, we will use a digital multimeter (DMM) to test the capacitor. Of course we will use the resistance mode (Ohms).
- Set your DMM to the resistance mode.
- Disconnect the capacitor from the circuit, if it is connected.
- Set the range of the DMM to the highest available.
- Connect the probes of the DMM to the terminals of the capacitor.
- If the capacitor is good, the meter should read “OL” (Open Loop) or “1” (short circuit). If the reading is not “OL” or “1”, then the capacitor is bad.
- Disconnect the probes from the capacitorand turn off the DMM.
The main precaution you should take when using this method is to make sure that the capacitor is not connected to any other circuit before testing. Otherwise, you could cause damage to the capacitor or the device it is connected to.
Method 2: Test the capacitor using an analog multimeter- Ohm mode
In this method of testing the capacitor,you will use AVO (Ampere, Volt Ohm Meter). The capacitor will be in the “Resistance” or “Ohm Mode”. Here are the steps to follow.
- Ensure that the capacitor that you want to test is fully discharged.
- Set the multimeter to the “Resistance” or “Ohm Mode”.
- Connect the multimeter leads to the terminals of the capacitor.
- Note the reading on the multimeter.
- If the reading is “OL” or “Open Loop” it means that the capacitor is open or not functioning properly.
- If the reading is “CL” or “Closed Loop” it means that the capacitor is functioning properly.
- If the reading is a numerical value, then it means that the capacitor is partially functioning.
- Disconnect the multimeter leads from the capacitor.
- Repeat the test with a different capacitor to compare the readings.
- Discharge the capacitor again before testing it with another multimeter.
One thing you should take note of when using this method to test the capacitor is that it can not be used to measure the capacitance value of the capacitor.
Also, it is important to ensure that the capacitor is fully discharged before testing it with the multimeter.
Method 3: Test the capacitor using a multimeter in capacitance mode
You can use this method only if your multimeter has the “Capacitance” or “Farad” features. Here are the steps to follow.
- First, ensure that the capacitor is fully discharged
- Remove the capacitor from the circuit.
- On your multimeter, ensure that the settings read Capacitance or “C”.
- Place the positive lead of the multimeter on the positive terminal of the capacitor and the negative lead of the multimeter on the negative terminal of the capacitor.
- Record the reading of the multimeter.
- Compare the reading of the multimeter with the capacitor’s rated capacitance.
- If the reading is within the rated capacitance of the capacitor, the capacitor is working properly.
Take note that this method is only ideal for small capacitors. This is because the capacitance of large capacitors can be incredibly high and the multimeter may not be able to measure it accurately.
Method 4: Test the capacitor using a simple voltmeter
You can use your simple voltmeter to test the capacitor. However, you ned to know the nominal voltage of the capacitor in order to use this method. This value is usually printed on the surface of the capacitor.
Here are the steps to follow.
- Set your voltmeter to the DC voltage range that is equal to the nominal value of the capacitor.
- Connect the negative lead of your voltmeter to the negative terminal of the capacitor.
- Connect the positive lead of your voltmeter to the positive terminal of the capacitor.
- Allow the capacitor to charge for a few seconds.
- Read the voltage displayed on the voltmeter.
- If the reading is within 10% of the nominal voltage, then the capacitor is functioning properly. If the reading is outside this range, then the capacitor is likely damaged and should be replaced.
Alternatively, you can use the “Volt Mode” of the multimeter to do the tests. Here are the steps you will use:
- Set the multimeter to the Volt mode.
- Connect the negative lead of the multimeter to the negative terminal of the capacitor.
- Connect the positive lead of the multimeter to the positive terminal of the capacitor.
- Allow the capacitor to charge for a few seconds.
- Read the voltage displayed on the multimeter.
- If the reading is within 10% of the nominal voltage, then the capacitor is functioning properly.
Method 5: Test the capacitor by measuring the Value of the Time Constant
In this method, the capacitor is tested by measuring the value of the time constant.
The time constant (τ) of a capacitor is the time required for the voltage across the capacitor to reach 63.2% of its maximum value when the capacitor is connected to a DC Voltage Source.
A simple equation can be used to calculate the time constant of the capacitor: τ = RC Where, τ = Time Constant R = Resistance of the Circuit C = Capacitance of the Capacitor To measure the time constant, the resistance of the circuit must first be determined.
This can be done with an ohmmeter or multimeter. Once the resistance is known, the time constant of the capacitor can be calculated by multiplying the resistance by the capacitance.
The result will be the time constant of the capacitor in seconds. The accuracy of this method will be dependent on the accuracy of the ohmmeter or multimeter used.
Once the time constant has been determined, the capacitor can be tested by connecting it to a DC Voltage Source and measuring the voltage across the capacitor over time. The voltage should reach 63.2% of its maximum value after the time constant has elapsed. If the voltage does not reach the expected value, then the capacitor may be faulty or have a different capacitance than expected.
Method 6: Test the capacitor using the Continuity Test Mode
You can use a digital multimeter or even AVO to execute the continuity test mode on the capacitor.
Here are the steps to follow:
- Disconnect the capacitor from the circuit board.
- Set the multimeter to the continuity test mode.
- Place the multimeter probes on both the terminals of the capacitor.
- If the multimeter beeps or displays a reading, the capacitor is in good condition.
- If the multimeter does not beep or display a reading, the capacitor is likely faulty.
Keep in mind that with this method, you are only testing the capacitor for shorts or open circuits, not for capacitance or leakage. For this, you will need to use a capacitance meter.
Method 7: Test the capacitor by doing a visual check

Image source Wikihow
You can also know the state of the capacitor by doing visual checkups.
To do this, firstly, you need to make sure that there is no evidence of leakage or damage. If no leakage or damage is present, then you can check the capacitor’s capacitance.
This can be done by using an ohmmeter or a capacitance meter.
If the capacitance is within the specified range, then the capacitor is working properly. Additionally, you can also check for any signs of corrosion or discoloration on the capacitor’s terminals. If everything looks fine, then the capacitor is likely in good working condition.
Conclusion
From all the methods of testing AC capacitors that we have discussed, You can choose one that is suitable for your scenario.
Just ensure that you use proper safety equipment and always comply with local safety standards while performing any kind of electrical work. And in case you want to buy AC capacitors in China, consider choosing ICRFQ.
We are a trusted supplier of high-quality AC capacitors that are manufactured to meet the highest industry standards.
If you want to find more Electronic Components Distributors, please check out the following articles:
Electronic Components Distributors In the USA
Electronic Components Distributors In UK
Electronic Components Distributors In China
Electronic Components Distributors In India
Electronic Components Distributors In Singapore
Electronic Components Distributors In Malaysia
Electronic Components Distributors In Vietnam
Electronic Components Distributors In South Korea
- Where to buy IC chips? The Best Guide? - March 26, 2024
- Breaking Down Barriers: Overcoming Obstacles in Cross-Border Electronic Component Trade - March 4, 2024
- Everything You Need to Know About Amplifier IC Chips - March 4, 2024


