
Last Updated on October 23, 2023 by Kevin Chen
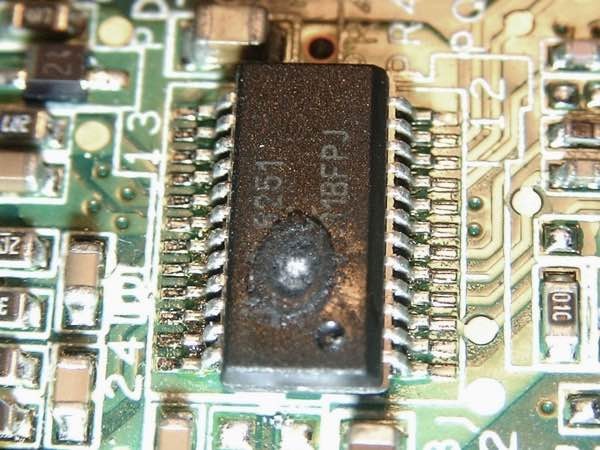
Image Source: Maker.pro
So you want to know how to troubleshoot an integrated circuit. Great! Troubleshooting skills are a must for any engineer in any discipline. The problem is, troubleshooting something as complex as an integrated circuit can seem like a daunting task.
Luckily, it’s not as hard as you think – with the right tools, techniques and knowledge, troubleshooting an IC isn’t so scary after all! Programming and debugging circuits can be tricky at times.
In this post we’ll help you get started with some fundamental troubleshooting techniques that work no matter what type of circuit you’re working with.
So let’s get started!
Reasons why ICs fail
There are many reasons why an IC might fail. Some of the most common reasons include:
The incorrect operating voltage
The voltage supplied to the IC has to be within a certain range or it will fail.
The voltage range is specified by the IC manufacturer in the datasheet. If the voltage is outside the specified range, the IC will fail.
The incorrect operating current
The current supplied to the IC has to be within a certain range or it will fail. The current range is specified by the IC manufacturer in the datasheet. If the current is outside the specified range, the IC will not function perfectly and will need some form troubleshooting.
Incorrect temperature
The IC is designed to work at a certain temperature. If the temperature is outside the specified range, the IC will fail. An example is if the IC designed to operate within a sp[ecific temperature limit is used in hot areas. It will definitely get damaged.
Incorrect circuit layout
The layout of the circuit (where components are placed) has to be correct. The correct circuit layout is specified by the IC manufacturer in the datasheet. If the layout is incorrect, the IC will fail.
Improper component connections
The connections between components (wires) have to be correct. The correct connections are specified by the IC manufacturer in the datasheet. If connections are incorrect, the IC will fail.
Tools and equipment you will need
Before you start troubleshooting an IC, make sure you have all the equipment and supplies you need.
You will almost always need an oscilloscope to troubleshoot circuits. Oscilloscopes are used to analyze the electrical signals in a circuit to determine what is causing an IC to fail.
Other tools you might need include a multimeter, a logic analyzer, a programmable power supply and a good schematic. A schematic is a visual representation of a circuit that shows the components and their connections. A multimeter is used to measure electrical properties like voltage and current.
Logic analyzers are used to display the state of digital signals in circuits. A programmable power supply is used to provide a controlled set of power conditions (voltage, current, temperature).
Check the datasheet
As we mentioned earlier, the datasheet is like a manual for an IC. It tells you exactly how the IC should operate, how it should be connected, and what conditions it can handle.
This information is critical for troubleshooting an IC as it will tell you what is causing the IC to fail. A datasheet can tell you a few things that are causing an IC to fail. First, it will tell you the voltage and current requirements of the IC. If these are not met, the IC will fail.
Second, it will tell you the correct circuit layout. If the circuit layout is incorrect, the IC will fail. Third, it will tell you the correct operating temperature and ambient conditions. If these are not met, the IC will fail.
Inspect the power supply to the IC
One of the first things to check when troubleshooting an IC is the power supply. If the power supply isn’t set up correctly, then the rest of the circuit won’t work properly.
To troubleshoot the power supply, use a multimeter to check the voltage at the IC’s input and output pins.
A multimeter can also help you troubleshoot the decoupling capacitor. You could also use an oscilloscope to check the voltages. An oscilloscope can also help you troubleshoot issues with the timing of the circuit.
If you notice that certain signals aren’t triggering at the right time, you might have an issue with the timing of the circuit.
To troubleshoot timing issues, use an oscilloscope to measure the timing of the signals in the circuit and see if they are within the correct thresholds.
Test individual components
If you’ve found a visual defect, you could test that part of the circuit to see if it is causing the problem. This is a good way to quickly narrow down where the problem is coming from.
Testing the power supply – If the problem is with the power supply, then the entire circuit will be affected. To test the power supply, you can use a multimeter to measure the voltage coming out of the IC.
Testing logic gates – If the problem is with a logic gate, then only one part of the circuit will be affected. To test a logic gate, you need to create a creative way to force the gate into the “on” state. One way to do this is to use a resistor to short the inputs to the gate. Another way is to use a diode to short the inputs.
Observe the input(s) and output(s)
Before you start changing circuit components, you want to make sure the input(s) and output(s) are correct. If you’re not sure what these terms mean, let’s take a quick look at how an IC works. An integrated circuit has input(s) and output(s).
The input(s) take an electrical signal and convert it into a voltage that the IC can process.
The output(s) take an electrical signal that the IC has processed, and convert it back into an electrical signal that can be used by other components in the circuit. If the inputs and outputs are incorrect, the IC will fail. The inputs have to be within the correct voltage range.
The outputs have to be within the correct voltage range. The correct voltage ranges are specified by the IC manufacturer in the datasheet. If the inputs and outputs are incorrect, the IC will fail.
Use a schematic to find where things are going wrong
This is where a schematic is useful. The schematic shows you where the inputs and outputs are located. It will also show you what other components are connected to the IC.
If something is connected to the IC that shouldn’t be, that’s probably what’s causing the IC to fail. The schematic will also show you the voltage and current paths in the circuit. If one of these paths is incorrect, that’s probably what’s causing the IC to fail.
This is a good test because you can change one thing at a time.
Once you’ve figured out what is causing the problem, you can fix it. This can save you a lot of time compared with tracing faulty connections on a circuit board.
Check the voltage(s)
The first thing you should do is check the voltages in the circuit. If a voltage is too high or too low, it will cause the IC to fail. The voltage ranges are specified by the IC manufacturer in the datasheet.
If the voltage is outside the specified range, the IC will fail. Now that we know what to look for, let’s start troubleshooting.
You take a look at the voltage coming into the circuit, and take a look at the voltage coming out of the circuit. Are the voltages correct? If not, you can fix them. If the voltages are correct, you need to keep digging deeper.
Check the IC signal waveforms
If you’ve checked the inputs, outputs, and voltages and everything is correct, there’s only one thing left to check – the signal waveforms inside the IC. The signal waveforms inside the IC are displayed on a graph. The graph shows you the signal waveform at each point in the IC.
If the signal waveforms are not correct, the IC will fail. The signal waveform is specified by the IC manufacturer in the datasheet. If the signal waveform is incorrect, the IC will fail.
Compare a bad IC with a good one
If you’ve narrowed down the problem to a specific part of the circuit, you can compare a defective part with a working part to see what the problem might be.
To do this, you need to access the circuit board and carefully remove the defective part. Take the defective part and the working part to a well-lit area and inspect them side-by-side. Make note of the design differences between the two parts and see if you can find the cause of the problem. When comparing the parts, make sure to check for the following issues:
– Poor solder connections
– Damaged or discolored parts
– Miswiring
– Wrong part type or size
Replace the integrated circuit
If you’ve exhausted all troubleshooting techniques and you can’t figure out what’s causing the problem, then you have no choice but to replace the IC. Before replacing the IC, make sure that the problem isn’t coming from another part of the circuit. Now that you know how to troubleshoot an IC, you’ll be able to pinpoint the problem in any circuit.
With these troubleshooting techniques, you’ll be able to quickly identify the cause of many IC failures. Now let’s move on to the final section where we’ll discuss common IC failure modes.
Choose a reliable IC supplier in China
Let’s say you have decided to replace the IC, ensure that you get the replacement from the best sources.
Choosing a reliable IC supplier in China is essential to the success of your project. A reliable supplier will help you find the correct IC for your project and will deliver the right integrated circuit for sale.
And this is where ICRFQ comes in. We are a trusted supplier of integrated circuits in China.
Contact is and we will deliver a perfect replacement for your defective IC.
If you want to find more Electronic Components Distributors, please check out the following articles:
Electronic Components Distributors In the USA
Electronic Components Distributors In UK
Electronic Components Distributors In China
Electronic Components Distributors In India
Electronic Components Distributors In Singapore
Electronic Components Distributors In Malaysia
Electronic Components Distributors In Vietnam
Electronic Components Distributors In South Korea
- Where to buy IC chips? The Best Guide? - March 26, 2024
- Breaking Down Barriers: Overcoming Obstacles in Cross-Border Electronic Component Trade - March 4, 2024
- Everything You Need to Know About Amplifier IC Chips - March 4, 2024


