
Last Updated on October 22, 2023 by Kevin Chen
It may seem challenging to wire a ceiling fan and light, but it doesn’t have to be; this article offers a step by step guide instructions on how to make proper connection for a particular ceiling fan and light installation. This project is a level 5 challenge on a scale of 1 to 10, but it could get more challenging if additional projects like running wire through walls are added.
Choosing the fan’s control method is the most critical factor to consider when wiring a ceiling fan and light. Some people may choose between having separate switches for the morning and fan and not having any switches (operating the fan and light using the provided pull chains).
Tools Required for Ceiling Fan Wiring
The process will run more smoothly if the proper tools are used. Additionally, it prevents you from becoming slowed down while attempting to cut cables with, say, a razor knife. Actual wire strippers will complete the task more quickly and precisely (10 times faster).
We’ll go through each form of switching mechanism and talk about how to wire and operate your ceiling fan or light using each style. There are four approaches.
Powered Ceiling Fan or Light Without Any Switches (No Switches)
We advise using this method when a switch cannot be run into the room. It calls for the ability to deliver power directly to the fan from a close-by site. The fans have pull-string switches to operate the fans and light kits, so it’s unquestionably a suitable wiring technique. This is how an electrical connection of this type is wired:
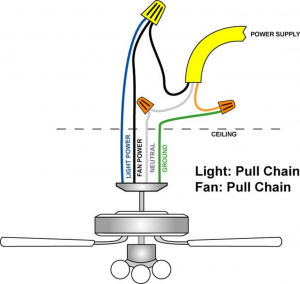
The fan and (optional) light kit are both powered by this essential connection, as can be seen. As is expected, the neutral and ground wires are connected. While most modern fans also include a separate blue wire that delivers electricity to the lights, a black wire typically provides the power for the fan motor. Even if you don’t intend to use a light kit, connecting this wire will allow you to add one later without disassembling and rewiring the fan from above.
Switching the Light and Adapting the Fan Pull Chain (Single Switch)
The most popular approaches are the ones that come after this. There is only one light switch needed for them. Many old houses never gave wiring up a second switch a second thought. The lack of powered ceiling fans in dwellings was mainly to blame. A single switch must control the light and/or both aspects of many homeowners’ ceiling fans. This is how the electrical connection’s wiring looks:
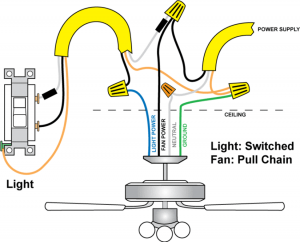
By inserting the switch, you can see that we changed the hotline to the light kit. To create this loop, many use a ground wire and a basic 12/2 (Romex) connector. You should tape the exposed white wire with black electrical tape to do this. This shows that the wire is a “hot” wire and not a neutral line, which is essential information for you and anybody else who works on the circuit in the future.
Even though we only display a short piece of electrical tape, we advise wrapping it entirely around the exposed white wire. We chose to wire the fan motor straight to the power supply. This enables us to operate the fan’s pull cord to switch it on and off. Additionally, this maintains the fan functional regardless of where the wall switch is located. You are now ready to connect the neutral & ground wires.
Single Switch for Switching the Light and The Fan
This is a slight modification of the earlier technique. From the wall switch, it turns on the fan and the light kit. Using the wall switch, you may now turn the fan on and off (along with the light). To stop the fan motor, you don’t need to go over and pull the chain. You are entirely free to choose this wiring strategy. Others often use this way, while some people favor option 2. This electrical connection looks like this:
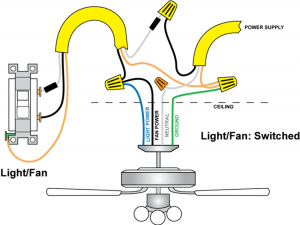
Keep in mind that the switch is how power is fed. The controller provides electricity to both the light kit and the fan motor. As anticipated, the neutral and grounds are hooked together, and everything is fine.
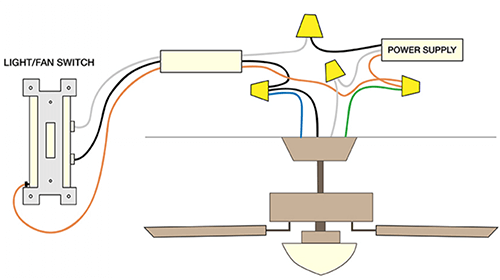
Switching the Light and The Fan from Different Switches (Two Switches)
This is the most adaptable method for electrically wiring a ceiling fan with a light kit. Both the fan and the room’s light can be controlled thanks to it independently. This dual control is housed in a cute tiny container along with a ton of quite valuable switches. Some even let you adjust the light intensity, which is a lovely touch. You can use combination dimmers and switches with your fan or fan and light, and the options are unlimited.
Of course, you can wire up two single pole switches if you want to be done right away. And this is how the wiring for the electrical system would appear in this scenario:
Though it seems more complicated, don’t worry about it. Your power supply line feeds both switches, which is the core concept. Each switch then supplies the light kit or the fan (black wire) (blue wire). At this point, all that needs to be done is to connect all the ground and neutral wires (respectively). Remember that the lines leading to and from the switches were expected to be 12/2 with the ground, so clearly identify them as “hot” wires by wrapping black electrical tape across the white ends.
Although the code has specific requirements, there are frequently several ways to complete a wire connection. As an illustration, the technique above used 12/2 wire which is typically available. The identical twin switch connections could be made with a little bit less effort using 12/3 wire:
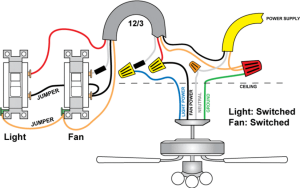
In this situation, you power both switches with a single hot (black) wire. To accomplish this, connect both switches with a longer wire section and jump. Jumping entails removing the insulation from a short portion of the wire. The size should be exactly right to loop around the hot terminal. The hot terminal of the first switch is then encircled by that exposed wire. Strip the end of the last, then attach it to the second switch. The white wire, which you mark as a hot wire by taping black to both ends, and the red wire serve as the hot returns.
The ground wire can also be jumped. The benefit of this way of jumping wires is that wire nuts are not required. Additionally, it allows for a simpler wiring layout and a greater workspace inside the box.
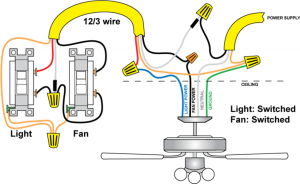
As an alternative to utilizing a jumper wire, try this similar method using 12/3 wire and wire nuts:
Switching the Light and Fan on And Off with The Same Switch (Single Switch)
This is the same as scenario 3 above. We wanted to draw attention to a few wiring variations that occur when electricity is located at the switch instead of in the ceiling. In older homes, this strategy is used about 50% of the time. Mainly when electrical wiring is installed in the crawl space, it happens. This approach also has a certain air of cleanliness about it.
It also has two beneficial features. The wires are consistent to start. The neutral wires have not been re-labeled. Second, this wiring design makes it simple to replace ceiling fans. All electricity to the ceiling box is cut off when the power is cut at the switch. Even though we still advise turning off the breaker and using a voltmeter to verify your wires, it’s essential to keep in mind.
Insightful Suggestions
Verify the power source before starting the project, regardless of the whether the breaker is tripped. As we’ve seen in multiple instances, more than one power source has occasionally been directed to a specific ceiling box. When we reached inside, a pleasant surprise awaited us! Furthermore, it’s critical to remember that the fundamental approach outlined here remains unchanged even though some power supplies enter through switches rather than from above. What has changed is that by simply turning off the switch, you may now deactivate you ceiling fan box safely. This is useful when changing out ceiling fans for a similar type. The breaker should still be turned off if someone comes in and tries to turn on the lights when you’re not looking.
Stripping Wires
We prefer to strip wires with a stripping tool rather than a razor blade. Several options are available, ranging from inexpensive wire stripping devices that cost about $2 to sophisticated wire strippers with cutouts for cable diameters of 10/2, 12/2, and 14/2.
Don’t Use the Included Wire Nuts
Never make use of the ceiling fan’s provided “wire nuts.” They typically aren’t large enough and hardly ever have a metal inner winding. They become unsafe to use as a result, if not difficult. Get a modest assortment pack at your neighborhood hardware or home improvement store. We advise taping any wire nuts once you have made those connections, though it is not usually necessary. Although wire nuts are frequently quite dependable, it never hurts to provide an additional degree of security to prevent them from ever unwinding. It simply needs very little time or money to implement this habit and is an excellent one to get into.
Conclusion
This article should help you install a ceiling fan and make all the necessary electrical connections to operate properly. Excellent addition to practically any area is a ceiling fan. It’s one of the simplest tasks to accomplish and has a significant aesthetic influence on your house. You might even come out like a true handyman if you use it.
For details on ceiling fan and light wiring, their purchase, or buying of supportive electrical components for quality connectivity, contact us at ICRFQ. We manufacture the best electrical components in China.
If you want to find more Electronic Components Distributors, please check out the following articles:
Electronic Components Distributors In the USA
Electronic Components Distributors In UK
Electronic Components Distributors In China
Electronic Components Distributors In India
Electronic Components Distributors In Singapore
Electronic Components Distributors In Malaysia
Electronic Components Distributors In Vietnam
Electronic Components Distributors In South Korea
- Where to buy IC chips? The Best Guide? - March 26, 2024
- Breaking Down Barriers: Overcoming Obstacles in Cross-Border Electronic Component Trade - March 4, 2024
- Everything You Need to Know About Amplifier IC Chips - March 4, 2024


