
Last Updated on October 22, 2023 by Kevin Chen
Image Source: Unsplash
Computer input devices are an essential part of modern computing. They make it faster and easier to perform tasks that would otherwise take much longer and require a great deal more effort. A computer keyboard is one of the most commonly used input devices, with most people using them on a daily basis.
There are a number of different components that go into making up a computer’s mechanical keyboard, but two, in particular, are keys: the printed circuit board (PCB) and the switch.
These two pieces work together to provide users with various inputs that help them type words, sentences, and documents.
This article will explain what makes up a PCB for computer keyboards as well as how each one works individually and together to create an effective system for typing user commands on screen.
What Is a PCB?
A printed circuit board (PCB) is a thin, flat piece of material that has copper traces on its surface that are used to connect components and build circuits.
These boards are used in pretty much every electronic device, including computers, smartphones, appliances, and much more. A PCB is one of the most important parts of a computer keyboard because it’s responsible for transmitting data between the keyboard and the computer.
The two components that make up almost all computer keyboards are the PCB and the switch. The PCB transmits signals from the keyboard to the computer while the switch sends input signals from the user to the PCB. The computer uses these two pieces of hardware to understand what the user is doing, such as typing a document or clicking a button on a website.
Understanding How Keyboards Communicate with PCs
Computer keyboards send information to a computer or other compatible device using either an unshielded twisted pair (UTP) or a shielded twisted pair (STP) cable.
A UTP cable uses 8 wires to carry information whereas an STP cable uses only 2 wires. A UTP cable is generally used for computer keyboards that are wired with a PS/2 connector.
A PS/2 connector is a 6-pin connector that was widely used in computers during the 1990s and early 2000s. Most modern computer keyboards use an STP cable with a USB connector.
How Computer Keyboards Work
A computer keyboard is made up of several different components that work together to make typing on a computer more efficient and accurate. When you press down on a key on a computer keyboard, the key depresses and makes contact with a spring-loaded switch.
This switch is connected to a circuit board inside the keyboard, which then sends an electrical signal to the computer through the wires in the USB or PS/2 cable connected to the keyboard.
The computer receives this signal and interprets it based on what application is running. If a word processing program is open, the computer receives the signal as a keystroke for the letter that was pressed. If a spreadsheet is open, it is read as a different keystroke.
What is a Keyboard PCB?
A PCB is a printed circuit board that is connected to switches on each key of a computer keyboard. This board is located inside the keyboard and is responsible for sending input from the computer to the computer.
The PCB is also responsible for sending input from the keyboard to the computer. A spring-loaded switch is activated when a key is pressed on the keyboard. This switch is connected to the PCB inside the keyboard.
The PCB then sends a signal to the computer, where the software translates the keystroke into an action, such as typing a letter or clicking a button. When the computer sends information back to the keyboard, the PCB receives the signal and sends the information to the spring-loaded switch connected to each key. There, the switch sends the information back to the user, such as a flashing light when a key is pressed too quickly.
Components of a Computer Keyboard PCB
A computer keyboard PCB comprises three major components: the processor, the scan circuit, and the matrix.
A processor, also called a microprocessor, is an electronic chip that handles instructions from a computer and sends information to it. It is located on the PCB inside the keyboard. The processor receives input from the computer and sends it to the scan circuit.
A scan circuit is a group of interconnected transistors that receive signals from data lines running along with each key of a keyboard. When one of these lines is activated, it sends an electrical signal to transistors inside the scan circuit. The transistors then activate switches on each key of the keyboard and send information to the processor.
The matrix is another group of interconnected transistors that receive signals from rows and columns in which each key sits in a keyboard. When one or more keys are pressed at once, they send signals through their respective rows and columns to four additional transistors in the matrix.
The additional transistors then send signals back through different paths to activate switches on each key of the keyboard and pass information back to the processor for translation into actions by software on a computer or mobile device.
Technical Specs of Keyboard PCB
How can I tell that a particular PCB is perfect for my mechanical keyboard? The fastest way is to look at the technical specifications of the PCB. Let’s look at some of these specs and how they affect the overall performance of the PCB in relation to the keyboard.
-Circuit board size:
This is the size of the PCB in millimeters. The standard size for mechanical keyboards is 60mm x 18mm. The 60mm refers to the width of the board and the 18mm refers to its length.
-PCB thickness:
The thickness of a PCB is important because it determines how much force will be required for each keystroke. Thicker PCBs are better suited for mechanical keyboards because they provide more resistance to bottoming out a keystroke, which can lead to premature damage to switches and other components on the board.
-Thickness of copper layers:
The thickness of copper layers on a PCB affects its ability to conduct electricity through its various circuits, which will affect how quickly those circuits are able to send information back and forth from different parts of the keyboard. Thicker copper layers also increase durability by providing additional protection against corrosion and wear over time.
-Isolation material:
Isolation material is used to separate different conductive layers on a keyboard PCB so that electricity can flow through the board without short circuiting. The isolation material used in a keyboard should be able to withstand high temperatures and provide a solid barrier between the copper layers so that signals are not interrupted or interfered with.
-Copper thickness:
Copper thickness refers to the total amount of copper present on a particular PCB and impacts how quickly information can be transferred from one part of the keyboard to another. Thicker copper layers also mean more durability over time, as they are less likely to corrode or experience wear from heavy use.
-Number of solder points and joints:
The number of solder points and joints on a PCB affects how easily it will come apart due to heat, moisture, or other factors, which is important because both liquid contact and improper storage can cause corrosion over time.
-Side plating:
Side plating is a thin layer of metal that is placed on both sides of a PCB to give it an extra layer of durability and protection.
-PCB material:
The material used in the actual PCB (printed circuit board) can greatly impact how quickly information travels along the board, which is important because the faster information can travel, the faster you will be able to register keystrokes and presses.
-Mounting plate:
The mounting plate is what holds all of the other parts together on a keyboard, so this part should be strong enough to hold up even when under heavy stress or pressure.
-Vias:
Vias are small holes that are drilled into a PCB in order to make sure that everything is connected and able to communicate with one another.
-Type of wire bonding used:
Different kinds of wire bonding can be used on a keyboard PCB, with some being stronger than others. You should also tell the type of wire that has been used on the PC
-Type of solder points and joints:
This is a key part of any PCB because it is what will determine how easily it comes apart. If the solder points and joints are too weak, they could come apart during shipping or when you try to open the keyboard.
-Number of layers:
The more layers a PCB has, the stronger it will be. The downside is that it will also take longer to produce and cost more money.
-Number of diodes:
Diodes are used to help regulate how electricity flows through the keyboard, so having more of them will give you a better keyboard.
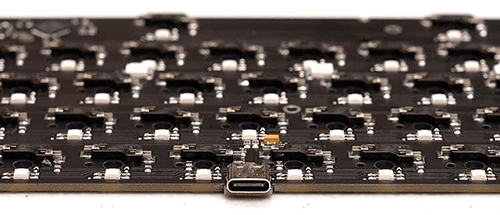
How are Keyboard PCBs connected to Switches?
A keyboard PCB is connected to switches on each key with a flexible printed circuit board (FPCB) or printed circuit board (PCB). When a key is pressed on the keyboard, the FPCB or PCB is pressed against the contacts on the switch.
This then completes the circuit and sends an electrical signal to the PCB inside the keyboard. The PCB receives this signal and sends it to the computer. The computer then interprets the keystroke based on what application is open.
Factors to consider when buying a keyboard PCB
There are a number of factors to consider when purchasing a keyboard PCB.
New vs used PCBs
First, you’ll want to decide whether you want to purchase a new or used keyboard PCB. New keyboard PCBs are often more reliable, but used PCBs can be cheaper. You should always strive to buy new PCBs from reliable keyboard PCB manufacturers and suppliers.
Type of keyboard switch
Next, you’ll want to consider the type of switch that is used on the keyboard PCB. The switch type is important because it determines how quickly the keys can be pressed and how accurately they can be pressed. There are different types of switches, each with its own advantages and disadvantages.
Some common switches include linear, tactile, and optical. Linear switches are the most common; they are the least expensive and work well for typing. Tactile switches are good for gaming because they can be pressed very quickly. Optical switches can be harder to use.
Capacitance
You should also consider the capacitance of the keyboard PCB. The capacitance of the PCB determines how quickly a signal can be transmitted between the keyboard and the computer.
Resistance rating
You’ll want to consider the resistance rating of the PCB. The resistance rating of the PCB determines how well it can resist interference and electromagnetic interference, or EMI. The resistance also determines how much current can be drawn from the PCB.
Keyboard switch durability
The durability of the keyboard switch is also an important factor to consider when purchasing a PCB. The durability of the keyboard switch determines how long it will last, and how many times it can be pressed before breaking.
Keyboard PCB design
Other than the technicalities that we have just covered, you should also look at the design of the PCB for the keyboard. The design aspect of the PCB covers issues such as the weight of the PCB, the board’s size, the quality of the components used, and how it will fit into your system.
Keyboard PCB design will mostly be determined by the type of keyboard you are purchasing. There are mainly three different types of keyboards: membrane keyboards, mechanical keyboards, and hybrid keyboards.
Plate Mounted Versus PCB Mounted Switches
Mechanical keyboards come with two main types of mountings. These are plate-mounted boards and PCB-mounted board switches. What is the difference between them?
A plate-mounted switch basically refers to a type of keyboard switch that is normally installed in a plate that is screwed onto the PCB. The plate-mounted switches are typically the cheaper type of switch, and are mostly found on entry-level keyboards.
A PCB-mounted switch can be found in higher-end keyboards. The PCB mounted switches are more expensive, but will also last longer than a plate mounted board due to the fact that they are not subjected to any shocks.
Can I change my keyboard PCB?
The answer is yes. In fact, the majority of custom keyboards are built with PCB-mounted switches.
Most keyboard PCBs are manufactured in a way that a user can replace the switches without any problems. The only problem you may experience is if the switch contacts are failing or if the keycap legends have worn off.
The main advantage of using PCB-mounted switches is that they will last longer than plate-mounted ones, and they will withstand more pressure due to the fact that they are not screwed onto a plate.
What are some of the reasons that can make me change my keyboard PCB?
There are many reasons that a user may want to change their keyboard PCB. One reason is to get a different switch type. Another reason is if the keycaps are worn, or if the legends on the keys are faded or missing.
If you want to change your keyboard PCB, you should make sure that it is not only for aesthetic reasons. If you do have a switch problem and the keycaps are worn off, then replacing the PCB will be necessary.
Another reason may be that you want a different switch type. If you are not satisfied with the switches, then you can replace them with another type.
What are some of the factors I should consider when replacing the keyboard PCB?
There are various factors that should be considered when replacing a keyboard PCB.
One factor is that there is a possibility of resoldering incorrect solder joints and causing damage to your keyboard or making it unresponsive. This can happen if you are not careful when soldering to the PCB.
Another factor is that you should make sure that your keyboard PCB is compatible with the switches that you are installing.
Another factor is that you should make sure what type of switch you are going to install.
Another factor is that you should make sure that you have the right tools and a lot of experience to do the job.
How do I know if my PCB keyboard is damaged?
Several signs can tell you that your keyboard PCB is not okay or is damaged. Let’s look at some of these signs.
-Switch not registering: When you press a key with a switch, you will feel a click sound. If you do not hear any clicking sound, then the switch is not working.
-Keyboard not registering: When you press a key with a switch, you will feel the key press at the top of your keyboard. If there is no response or it feels soft, then your keyboard is damaged.
-Unresponsive or Keyboard won’t work: When you press a key with a switch, it should register and make a noise to let you know that it has been pressed. If this does not happen and if the keys do not respond to your commands; then it means that your keyboard PCB is damaged or unresponsive.
-Keyboard lights up but does not work: When you have installed any switches on your non-working keyboards, some of them may light up and some may stay dark and unresponsive depending on what type of switches have been installed.
-LEDs won’t turn on: When you press a key with a LED, you should see an LED light up and then change to a color. If this does not happen, then your keyboard PCB is damaged.
-LEDs stay on: When you press a key with an LED, the LED should turn on and keep shining to let you know that it has been pressed. If this does not happen, then your keyboard PCB is damaged or doesn’t function properly.
-LEDs are flicking: When you press a key with an LED, it should make some noise or the LEDs should blink to let you know that it has been pressed. If this does not happen or if the LEDs just stays on without blinking; then your keyboard PCB is damaged or unresponsive.
If these signs are present in your keyboard PCB; then it means that there might be some damage to your PCB or its wiring inside which may cause issues with working properly.
How many layers is a keyboard PCB?
A keyboard PCB can be built on many layers. The following are the most common layers:
- Bottom layer (copper layer)
- Top layer (dielectric/rubber layer)
- Middle layer (dielectric/rubber layer)
- Top plate (copper layers)
- Bottom plate (copper layers)
- PCB shield (copper layers)
- Backplate assembly (dielectric/rubber layers and backplate assembly)
- Metal case (metal case and metal backplate assembly).
How do you test a keyboard PCB?
A keyboard PCB can be tested by using a multimeter to test the different components on the PCB. The following are the most common components that are tested:
-Keyboard PCBs usually have two LEDs located on top of the keyboard PCB. If a LED does not illuminate, then there is a problem with that particular component.
- Test for continuity of each component to make sure there is continuity between each component and its corresponding pin or through the hole on the PCB and board assembly.
- Test for the correct polarity of each pin or through the hole of each component to ensure it is working correctly and providing voltage to the corresponding pin or through the hole on the keyboard PCB and board assembly.
Choose a reliable keyboard PCB manufacturer
Finally, when it comes to buying keyboard PCBs, there are a few things that you should consider. First, you want to make sure that the keyboard PCB manufacturer is reputable. This means that they have a good reputation for making PCBs of high quality and reliability. Second, you want to make sure that the manufacturer has an excellent warranty on their products.
You may also consider using the services of a sourcing agent such as ICRFQ. We will help you locate such manufacturers with so much ease. This will save you the cost of going to China, which can be a hassle.
If you want to find more Electronic Components Distributors, please check out the following articles:
Electronic Components Distributors In the USA
Electronic Components Distributors In UK
Electronic Components Distributors In China
Electronic Components Distributors In India
Electronic Components Distributors In Singapore
Electronic Components Distributors In Malaysia
Electronic Components Distributors In Vietnam
Electronic Components Distributors In South Korea
- Where to buy IC chips? The Best Guide? - March 26, 2024
- Breaking Down Barriers: Overcoming Obstacles in Cross-Border Electronic Component Trade - March 4, 2024
- Everything You Need to Know About Amplifier IC Chips - March 4, 2024


