
Last Updated on October 22, 2023 by Kevin Chen
Electronic devices are becoming more popular every day, and there’s no shortage of projects you can do with them.
Whether you want to repair equipment in your home for peace of mind, know how to troubleshoot electronics to get started in this rewarding field, or build your electronics projects from scratch, you’ll want to know how to use an ohmmeter.
This handy tool not only allows you to check the resistance of different devices but it can also be used in other ways. Here’s everything you need to know about ohmmeters.
What is an ohmmeter?
An ohmmeter is a device that measures the resistance of an object. It can be used to determine if something is working correctly, or whether it’s broken. You might have seen them in older electronics shops, as they were common before digital multimeters became popular.
This tool has been around for a long time, and it still has its uses today, especially when you’re doing electronics projects. Read the following article to learn more about how to use an ohmmeter.
How do you use an ohmmeter?
There are two ways you can use this tool: by touch and by a probe.
The first method is used when you want to measure something that’s not very accessible or if you want to test a part in your hands. In order to do this, touch the probes on either side of the object and read the result on the meter display. A reading of zero means that it has no resistance while infinite means that it’s open.
The second method is used when you want to measure something that’s not physically accessible, like a component inside a circuit. In order to do this, you need to attach one probe to the wire and the other to the component. Read the result on the meter display and compare it with your reference chart. A reading of zero means that it has no resistance while infinite means that it’s open.
Ohmmeter working principle
How does a typical ohmmeter work? You may ask.
Since an ohmmeter is a measuring tool, its working principle entails finding the value of the resistance. This means that at the end of the day you should be able to tell the actual figures of the resistance.
So, how does this happen?
A typical ohmmeter has a needle and test leads. The test leads are connected to the needle and the needle reacts in accordance with the resistance that it is being tested against.
The needle has a spring attached to it so that it will always return to its set position. This is also called an equilibrium point since the spring pulls it back to its original position.
The needle movement is detected by a galvanometer or a moving coil meter, which is connected to the ohmmeter.
When the needle moves away from its equilibrium point, a certain amount of current flows through it and this current makes the galvanometer move according to how much current flows through it. The meter displays this movement in terms of voltage and hence, you get your reading.
The needle movement causes direct current (DC) when moving toward infinity and alternating current (AC) when moving towards zero.
The needle can reach its lowest point which is usually zero. That is referred to as the zero resistance between the two leads.
Types of Ohmmeter
Ohmmeters are classified mainly based on their working mechanisms and areas of application. There are three main types of ohmmeters that you are likely to find in the market. These are series type ohmmeter, shunt type ohmmeter, and multi-range type ohmmeter.
What is the difference between them and which one should I buy? Let’s have a brief discussion on each type of these ohmmeters:
Series type ohmmeter
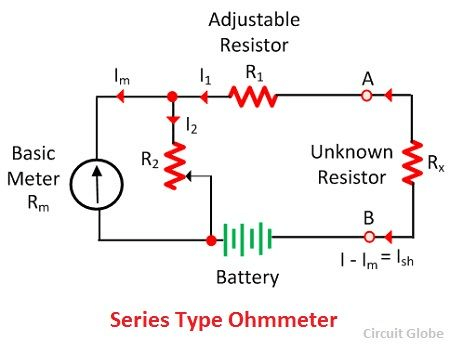
This type of ohmmeter derives its name based on how it is used: the resistance that you want to measure should be connected to this ohmmeter in series. This means that the resistance to be measured should be connected in series to the ohmmeter and then the meter is connected to a power source.
Ohm’s law can be used to calculate the resistance of a circuit using a series type ohmmeter. The formula for calculating the resistance of an electrical circuit is given:
R=V/I
Where R=Resistance in Ohms, V=The voltage across the circuit, and I=The current flowing through it.
A series type ohmmeter can measure very low resistances (up to 1 million ohms) but cannot measure very high resistances (greater than 1 million ohms). This makes it suitable for measuring small resistors like those found on electronic components.
It can also measure open circuits, short circuits, and other types of faults involving resistors.
Shunt type ohmmeter
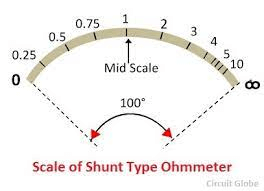
When it comes to the shunt ohmmeters, the connection is opposite to the previous ohmmeter type that we have just looked at. This implies that the calculating component is connected in parallel to the circuit.
For this reason, the shunt ohmmeter is ideal for measuring only low-value resistance. The resistance reading is taken from the measuring point (the shunt wire) and the voltage is measured at the circuit point.
Shunt ohmmeters are often used to measure resistance in circuits that have more than one component.
The measuring range of this type of ohmmeter is very small, usually less than 10kΩ. However, they can measure high-value resistors (up to 1 million ohms).
Some types of shunt ohmmeters are also used for measuring capacitance and inductance.
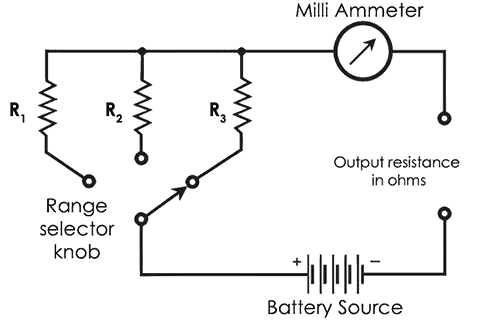
Multi-range ohmmeter
The name is self-explanatory of what you can achieve with this type of ohmmeter. It can give you multiple and high ranges of resistance. This is possible because it comes with an adjuster that allows you to adjust and test different ranges based on various requirements.
Let’s say you want to find the resistance between a range of 10kΩ to 20kΩ, then you can adjust the range to find the exact value.
Usually, it comes with an auto-ranging feature where it will automatically detect the range that you want and give you an accurate reading.
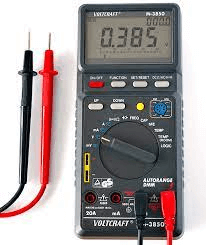
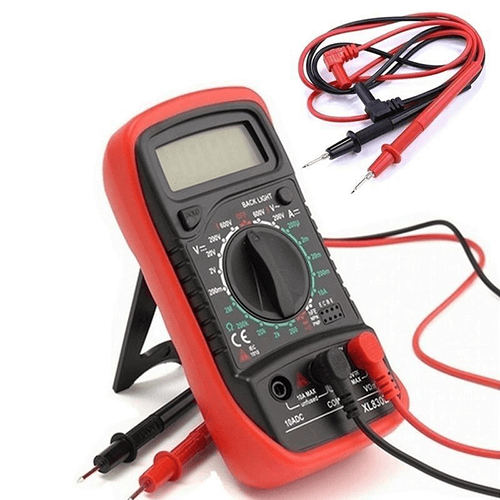
What does an ohmmeter look like?
An ohmmeter looks like a small electronic device that can be used in your lab. It has an LED indicator, a test button, and a display screen.
The LED indicator lights up and shows the approximate value of the resistance of the circuit that you want to measure.
The test button is used for testing any circuit’s resistance by pressing it.
And finally, the display screen is used to show you the exact value of the resistance in real-time.
Components of an ohmmeter
Now that you know about the looks, let’s have a brief discussion about the key components that make up a typical ohmmeter.
Mechanical adjustment screw
The main function of an adjustment screw is to adjust the pointer within or in the scale. This is a vital function since in most cases the pointer must be first calibrated for you to get the most accurate reading from your ohmmeter.
The scale
The scale is used to show the value of the resistance. The scale is usually calibrated in ohms (Ω).
There are two main types of scales used in ohmmeters. These are digital and analog scales.
For the analog scale, you need to be keen on where the needle or pointer will settle whenever you are trying to measure the electrical resistance of a circuit. Digital scales will on the other hand give you a precise value of the resistance.
The pointer
The pointer is an extra-fine metal that can be used to show you the exact value of the resistance. It moves within or on the scale when you press the test button. The needle can be moved manually by using a screwdriver. Pointers are mainly found on the analog ohmmeters.
The display screen
It shows you the exact value of your ohmmeter’s resistance reading in real-time.
Display screens come in different sizes among other detailed features that can contribute to you choosing one screen over the other.
The probe
The probe is a metal that is used to make contact with the circuit being measured. It has two ends, one for making contact with the metal parts of the circuit and another to be inserted into the ohmmeter scale. The probe is usually made of copper.
A probe can either be positive or negative. This is usually indicated to enhance convenience and safety when using an ohmmeter.
Selection switch
This button is used to select the desired ohmmeter measurement mode. The selection switch has two options, one for resistance and the other for capacitance.
Test button
The test button is used to make contact with the circuit being measured. It is connected to a system of an electrical circuit that allows you to make your measurement as soon as you press on it. It has two ends, one for making contact with the metal parts of the circuit and another for inserting into the ohmmeter scale. The test button usually has two options, one for resistance and another for capacitance.
Applications of ohmmeters
At this point, you know the basic function of the ohmmeter is to measure resistance. There are fields and industries in which ohmmeters are used regularly. Let’s look at some of these application areas.
-In small ICs and PCBs: are used in the development of microprocessors and PCBs. They are used to test the resistance of the circuit components including resistors, capacitors, transistors, and diodes.
-Electrical power systems: they are used to measure the resistance of electrical power lines and transformers in power plants.
-Electrical wires: ohmmeter is used to measure the resistance of wires that carry electricity for use in homes and buildings.
-Electronic devices: ohmmeters are usually carried by technicians when working on electronic devices like computers, televisions, etc.
-Medical instruments: this includes anything that involves electrical current like heart defibrillators, defibrillator pads, and other medical equipment that needs to be checked for its functioning.
-Telecommunication systems: these include radio transmitters and receivers that use electrical circuits as their operating parts. The ohmmeter is needed to measure the resistance between circuit components like transistors or diodes to determine whether they are working properly or not.
-Transport systems: ohmmeters are used to measure the resistance of the electrical circuits in trains, buses, air and sea vessels, and other vehicles that use electricity.
What is ohmmeter calibration?
The ohmmeter calibration refers to the process of calibrating the instrument. Any ohmmeter will be calibrated at least once in its life. Calibration is the process of adjusting the instrument to match the actual value of the resistance that it measures.
The calibration process involves measuring a known value of resistance and setting it on the dial or display of an ohmmeter. After this, an unknown resistance is measured and compared with that one that was set on the dial or display. The difference between these two measurements is then used to calculate how much adjustment needs to be done on that instrument.
The calibration process involves a number of steps, which are as follows:
Step 1: Measure the resistance of the unknown resistance with a known value of resistance.
Step 2: Calculate the difference between these two measurements and set it on the dial or display.
Step 3: Measure the unknown resistance again and compare it with a known value of resistance.
Step 4: Calculate the difference between these two measurements and set it on the dial or display.
Step 5: Measure the unknown resistance again and compare it with a known value of resistance.
Step 6: Calculate the difference between these two measurements and set it on the dial or display.
Step 7: Repeat steps 1 through 6 for all possible combinations of known values, unknown values, and measured values to obtain a calibration curve for that instrument.
How to improve the accuracy of an ohmmeter
Other than calibration, there are other techniques and tips that you can use to improve the accuracy and efficiency of your ohmmeter. They include;
-Use a good quality probe.
-Use a good quality multimeter.
-Calibration of the meter.
-Measurement using different resistance values and checking the difference between them with a known value.
The accuracy of an ohmmeter is determined by the type of material being measured, calibration, and how well the instrument is used. An ohmmeter is accurate when it measures small changes in resistance accurately, and its accuracy can be affected by a number of factors such as the type of material being measured, humidity, temperature, etc.
It should also be noted that if an ohmmeter is calibrated according to American National Bureau of Standards (ANSI) or International Electrotechnical Commission (IEC) standards, it may not be as accurate as one that has been calibrated according to other standards.
How to choose an ohmmeter(buying guide)
So you are at a point of buying an ohmmeter? Here are a few factors and tips that you should consider;
Know the type of ohmmeter that you want
We have already discussed the different types of ohmmeters in the market. You should know whether you want series, shunt, or multiple range types of ohmmeters. Which one do you think will be suitable for your application? Compare the advantages and disadvantages of each type then make the final decision.
Know the range of resistance that you want to measure
This is another important factor because different types of ohmmeters have different ranges for measuring resistance. For example; an ammeter has a range between 0 and 100,000 ohms.
The most common range that is used in the industry today is 1 to 100,000 ohms or 1 to 10 megohms. If you do not know what you want to measure, then it would be better for you to get an ohmmeter with a low range because it will provide more flexibility and option for your work.
Know the type of material that you are going to use or measure (if applicable)
The materials that are commonly used by technicians today include metals such as copper, aluminum, brass, and many more. It is important to know the type of metal that you are going to use because it will make your work easier. For example, an ammeter should be used on copper only because it will not work on aluminum.
The type of ohmmeter that you want to buy also depends on what kind of material you are going to measure.
Know the cost of your ohmmeter
There are different types of ohmmeters in the market. The prices may vary depending on their functions and features. You should get an ohmmeter with features that you need for your application and a price range that you can afford.
If you choose a cheap option, then it will not have all the necessary features for your application as well as its price may be higher than what you think or expect it to be.
Know if there is a warranty or not
A warranty is always very beneficial but some manufacturers do not include them in their ohmmeters. This may be the case if you are buying from a small company that does not have enough money to provide the warranty.
A warranty will always be beneficial because it will protect your investment and assure that you have a working ohmmeter at all times.
Analog vs digital
Analog ohmmeters are used to measure resistance between two points. They are more precise than digital ohmmeters, but they are also more expensive.
Digital ohmmeters, on the other hand, can be used to measure resistance between two points and the voltage between two points.
The main advantage of a digital ohmmeter is that it can be used with multiple devices without the need for any extra equipment.
The main disadvantage of digital ohmmeters is that they are not as precise as analog ones.
Ohmmeter build quality
You should also check the quality of the ohmmeter that you want to buy. The build quality of an ohmmeter should be good enough to be able to measure resistance accurately.
An ohmmeter could get damaged if it is not well built and if the parts are not properly assembled, there is a chance that the resistance will be inaccurate. Find out the type of materials that have been used to construct the ohmmeter and how each component has been assembled.
FAQ about ohmmeters
Let’s look at the questions that most people tend to ask about ohmmeters:
What is the ohmmeter scale?
The scale is the range of measurement that each point on the scale represents. The range of measurement is usually displayed at the bottom of the instrument.
What is an analog ohmmeter?
An analog ohmmeter uses a moving needle to indicate resistance value. It has a fixed scale and can only measure resistance. An analog meter will not display voltage or current value, but it can still be used to measure resistance between two points.
What is a low resistance ohmmeter?
This is a type of ohmmeter that is used for measuring the micro values of resistance. It is an ideal choice when you need more precise figures of resistance.
How much voltage is required by an ohmmeter?
Most ohmmeters in the market need at least 1.5 voltage to run effectively. However, don’t be surprised to come across ohmmeters with different voltage capacities.
Where to buy ohmmeters?
The right place to buy is from reputable suppliers and manufacturers in China. This way, you can be sure of the type of ohmmeter that you will end up with.
Decide the type and specifications of the ohmmeters that you would like to have. From there, you can proceed to find the manufacturers and suppliers of the same.
We all know how hard it can be to find such manufacturers in China, and that is why sourcing agents are there. For instance, ICRFQ can source for you the right ohmmeters from reputable manufacturers and suppliers in China.
If you want to find more Electronic Components Distributors, please check out the following articles:
Electronic Components Distributors In the USA
Electronic Components Distributors In UK
Electronic Components Distributors In China
Electronic Components Distributors In India
Electronic Components Distributors In Singapore
Electronic Components Distributors In Malaysia
Electronic Components Distributors In Vietnam
Electronic Components Distributors In South Korea
- Where to buy IC chips? The Best Guide? - March 26, 2024
- Breaking Down Barriers: Overcoming Obstacles in Cross-Border Electronic Component Trade - March 4, 2024
- Everything You Need to Know About Amplifier IC Chips - March 4, 2024


