
Last Updated on October 22, 2023 by Kevin Chen
It’s understandable to feel confused when you see the variety of electrical weatherheads on the market. The different shapes and sizes can be daunting.
How does one select? Today, we’ll cover how to select the right weatherhead for your application type, as well as shed some light on what a weatherhead is and why you need one in the first place.
Read on to learn more about selecting an appropriate Weatherhead for your needs!
What is an electrical weatherhead?
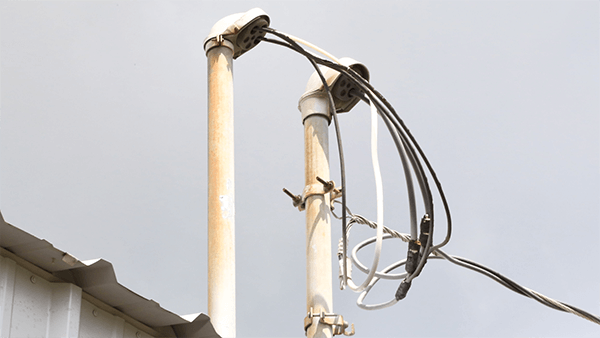
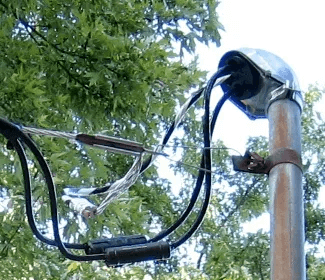
An electrical weatherhead is a device that attaches to the end of a flexible electrical wire where it connects to an electrical box or other types of enclosure.
The weatherhead protects the connections from the elements, and also prevents water from entering the enclosure through those connections.
Weatherheads are available in a variety of sizes and configurations. They are usually made from metal, but some are made from plastic.
What does an electrical weatherhead look like?
An electrical weatherhead looks like a small metal box, with a hole in its base. Some types of weatherheads will have a flange on the bottom side of their base, while others will have a threaded hole for attaching them to an existing box or enclosure.
Weatherheads can also be used to install wiring to the exterior side of your home. These are called wire-in weatherheads, and they have a hole in their base that you can use to run your wiring through before attaching it to the side of your home.
How does a weatherhead work?
A weatherhead must be installed properly for it to work correctly. It’s important that you follow the instructions that come with your specific model of weatherhead as each one may vary slightly in installation procedures.
Generally speaking, though, you will need to use screws to attach it to an electrical box or other types of enclosure. Once attached, the weatherhead will provide an opening to connect your electrical wire to the enclosure.
The weatherhead also has a cover that closes off that opening when it’s not in use, protecting your connections from water damage.
What are the different types of weatherheads?
The most common types of weatherheads include:
Flanged Weatherhead
This type of weatherhead is used with an electrical box that has a flange around its opening. A flanged weatherhead is installed by attaching it to the underside of the box’s flange. It provides a space for wires to be connected to the box, and also protects those wires from moisture and other elements.
Threaded Weatherhead
This type of weatherhead is used when an electrical box does not have a flange around its opening. A threaded weatherhead will be attached directly to the box, using screws to secure it. The threaded weatherhead will provide a space for wires to be connected to the box, and also protect those wires from moisture and other elements.
Wire-In Weatherhead
This type of weatherhead is used when there is no existing electrical enclosure or box where you need to install your weatherhead. A wire-in weatherhead will have a hole in its base that you can use to run your wiring through before attaching it to the side of your home.
It provides a space for wires to be connected to the side of your home, and also protects those wires from moisture and other elements.
Where is an electrical weatherhead installed?
An electrical weatherhead is installed where you need it, depending on which type you use. A threaded weatherhead is installed below an existing box or enclosure, and the wires are threaded through its base before being attached to the side of your home.
A wire-in weatherhead is installed wherever you want to run your wiring, then attached to the side of your home.
Design and construction of an electrical weatherhead
An electrical weatherhead is made to protect your wiring from moisture and other elements. It is made of durable materials that can withstand the test of time, and it has a weather-resistant finish to protect it from the elements.
A typical electrical weatherhead is made of a combination of aluminum and galvanized steel in either a bronze or black finish.
It is usually attached to the exterior side of your home through the use of two screws, and a wire-in weatherhead is installed wherever you want to run your wiring. The weatherhead’s mounting screws are then attached to the side of your home with a drywall screw.
When it comes to the design aspect, a typical weatherhead is designed to be as unobtrusive as possible, so it blends in with the rest of your home. It is usually made of aluminum or galvanized steel and comes in a variety of finishes, including white, bronze, and black.
What is the size of the weatherhead?
The size of the electrical weatherhead varies depending on where it is going to be installed. For example, a weatherhead for an attic or crawl space needs to be smaller than one for a basement.
This means that the size of the electrical weatherhead will vary from one installation to another.
The electrical connector that comes with most electrical weatherheads is designed as an insurance policy for your home’s wiring system. It makes sure that no moisture can damage your wiring while it remains in place, so it acts as an extra layer of protection.
Installation of an electrical weatherhead
Installing an electrical weatherhead is easy when you do it yourself. If you are hiring a professional to do the job for you, they will likely measure where you want the weatherhead installed and provide you with an estimate. Once the job is done, they will provide you with instructions on how to use your new weatherhead.
How high does a weather head have to be?
The height of the weatherhead will depend on the location and purpose of where you want it. For example, if you install a weatherhead for an attic or crawl space, the electrical connector should be installed between the ceiling and floor.
If you are installing a weatherhead for a basement, it should be installed between the floor and ceiling.
The general rule we have found is that if you have to climb through your attic or crawl space to get to your electrical panel box, then the electrical connector should be at least 6 feet above ground level.
If you can access your electrical panel box without going into your attic or crawl space, then leave more room between the connector and your surface so that water doesn’t pool in an area where it can cause a short.
For in-floor weatherheads, the electrical connector should be at least 8 feet above the floor. In-wall weatherheads should be installed at least 12 inches from the drywall, and out-of-the-way weatherheads can be installed up to 20 feet from your home’s exterior wall.
How big do I need my weatherhead?
There are three main factors that will determine how big of a hole you need to drill in your home’s exterior for your new weatherhead: The depth of your existing wiring, where you want your rain head, and how much water it will hold.
If you are installing a new in-floor or in-wall weatherhead, then the depth of your existing wiring will determine how big of a hole you need to drill. If you are installing an out-of-the-way weatherhead, then the amount of water it will hold will determine how big a hole you need.
But if your existing wiring is less than 6 feet deep, then the size of the hole you need will be determined by where you want your rain head and how much water it will hold.
If you want an in-floor or in-wall weatherhead that holds at least 30 gallons of water, then make sure to leave at least 30 inches between the bottom of your new weatherhead and the floor or wall below it.
How much wire do you leave out of the weatherhead?
The amount of wire you leave out of your weatherhead will depend on your existing wiring.
If you have an existing 6-foot deep in-floor or in-wall weatherhead, then you need to leave at least 12 inches of wire above the water level.
If you have an existing 12-foot deep in-floor or in-wall weatherhead, then you need to leave at least 18 inches of wire above the water level.
If you have an existing 20-foot deep in-floor or in-wall weatherhead, then you need to leave at least 24 inches of wire above the water level.
How much water does my rain head hold?
The amount of water it holds will depend on how much water you put in it.
A 30-gallon rain head will hold at least 30 gallons of water. A 50-gallon rain head will hold at least 50 gallons of water.
A 100-gallon rain head will hold at least 100 gallons of water.
A 250-gallon rain head will hold at least 250 gallons of water. A 500-gallon rain head will hold these same amounts of water.
How much weight can my weatherhead handle?
The amount of weight your weatherhead can handle depends on the concrete and whether or not you have a floor below it or a wall behind it.
The weight is not limited to just people, but also other items such as cars, bikes, furniture, etcetera that someone might want to put on your weatherhead.
If you have a floor below the weatherhead, then you can put up to 150 pounds on the head. If you have a wall behind it, then you can put up to 250 pounds on the head.
If there is not a floor or a wall behind the weatherhead, then we recommend that you use your best judgment when putting heavy items on it.
The weight limit for most people will be around 50 pounds.
What does the cap on top of a Weatherhead do?
The cap on top of a Weatherhead is there to keep rainwater from running down the side of the weatherhead.
If you are putting a large amount of weight on your weatherhead, we recommend using a cap on top of it.
What is the difference between a Weatherhead and a Rain Head?
A standard rain head will have an opening that is about 1″ in diameter. A standard weatherhead will have an opening that is around 6″ in diameter.
A rain head will only hold up to 50 gallons of water and it does not contain an internal pump (it is just attached to your pipe). A weatherhead has an internal pump that can hold up to 150 gallons of water, but it also has a cap.
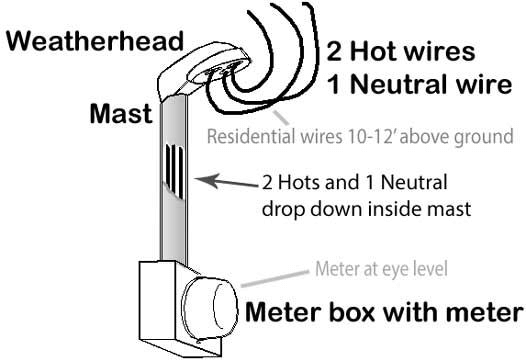
What is a mast in an electrical weatherhead ?
A mast which is also known as a riser is a cable that is attached to the weatherhead . The mast will go up and down with the water level in the weatherhead.
How do I adjust a rain head?
You can adjust a rain head by turning it either clockwise or counterclockwise. This can be done with your hands or with a wrench. It may be easier to tighten a rain head by turning it clockwise because this will also tighten the cable that is attached to your pipe.
How do I attach my electrical weatherhead to my pipe?
There are many different ways to attach your electrical weatherhead to your pipe. It is important that you use the proper attachment for your pipe. You can use a screw, bolt or you can use a clamp.
What should I consider when buying an electrical weatherhead?
Here are the key things that you should look at on a typical electrical weatherhead:
– The diameter of the pipe
– The length of the electrical weatherhead
– The size and type of fitting that you want to attach your electrical weatherhead to
– The material that the electrical weatherhead is made out of
– If you are planning on putting a mast on your electrical weatherhead, you should also consider whether or not it comes with a mast. It is important that you have a high quality mast, but if you don’t have one already then it will be very hard to attach your electrical weatherhead to your pipe.
Conclusion
I hope that you have learned all the important details about electrical weatherhead. Now you know how to attach your electrical weatherhead to your pipe, and you know what things to look for when buying one.
And in case you would like to buy one, consider contacting ICRFQ. We are a trusted supplier of electrical weatherheads in China.
If you want to find more Electronic Components Distributors, please check out the following articles:
Electronic Components Distributors In the USA
Electronic Components Distributors In UK
Electronic Components Distributors In China
Electronic Components Distributors In India
Electronic Components Distributors In Singapore
Electronic Components Distributors In Malaysia
Electronic Components Distributors In Vietnam
Electronic Components Distributors In South Korea
- Where to buy IC chips? The Best Guide? - March 26, 2024
- Breaking Down Barriers: Overcoming Obstacles in Cross-Border Electronic Component Trade - March 4, 2024
- Everything You Need to Know About Amplifier IC Chips - March 4, 2024


