
Last Updated on April 3, 2023 by Kevin Chen
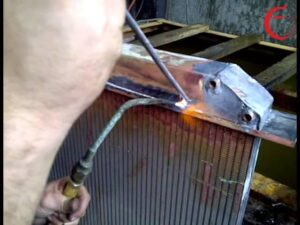
Image source YouTube/Tibright Welding
When your car’s radiator is damaged, there are different ways of repairing it. One of the possible solutions is to solder it. The process simply entails using a solder and a soldering iron to join two pieces of metal.
Soldering a radiator is not an easy task to accomplish. Especially when you consider the important role that this component plays in a vehicle. You need to ensure that everything is done right otherwise you may end up causing serious damage.
In this article, we are going to break down all the steps for the soldering radiator. We will also give you surefire tips for doing the job safely and in an efficient manner.
Why do I need to solder my radiator?
Well, various incidences, scenarios, and situations will push you towards soldering a radiator. Some of these reasons include:
- Radiator leaks: A radiator is likely to leak due to breakage and damage. Let’s say an object hit a joint causing physical damage. Or, you have used the radiator for a long period and some of the joins suffered massive wear and tear. Soldering will be an ideal solution as it will stop the leak.
- When doing routine maintenance on the radiator: To keep your radiator in perfect condition, you will have to do routine maintenance. Soldering could just be part of the radiator maintenance practices.
- Correcting an installation: There could be a mistake that was made when installing the radiator. Such mistakes can lead to leakage and dysfunction of the radiator. Soldering can solve this problem
- When upgrading the radiator: Would you like to add some components to your radiator? You will be forced to add new joints and this will be possible through a soldering process.
Regardless of the reasons for the upgrade, you need to ensure that the process is done properly. And this is why in this article we are going to give you full steps on how to solder a radiator.
Tools you will need
Here are the important tools and equipment that you will need to safely solder a radiator.
- A radiator to be soldered
- A soldering iron
- Solder
- Wrench
- Wire brush
- Pipe cutter
- Tinning flux
- Emery cloth
Have you gathered all, the tools? The next thing to do is wear safety gear. This includes goggles, gloves, and other pieces of clothing that are needed for the soldering job.
Step 1: Clean the area to be soldered
Like in any other soldering project, you need to clean the area to be soldered. And not only to clean but to do the job thoroughly.
Cleaning will ensure that the solder will guarantee the strength of the solder as it will be free from impurities and defects. Keep in mind that the presence of impurities will compromise the quality of the solder meaning that you will end up with weak joints.
Cleaning also improves the quality of adhesion between the radiator and the soldering material.
This step is pretty simple as you will only need to remove the contaminants from the area.
You can use a grinder and a steel wire to remove paint and other stubborn elements that are in the affected area of the radiator.
A brush wire and sandpaper will come in handy in removing the debris around the area. They smoothen the surface to be cleaned. After all, the area to be worked on should be free of any rough spots.
Wipe the target area using a lint-free piece of cloth. This is also good at clearing debris.
For a more thorough, job, you may consider using flux. Apply a small quantity of flux on the joint that you want to solder. You will then enhance its effectiveness with the use of a soldering iron.
You can repeat the cleaning process several times until you are fully satisfied with the job.
While cleaning the area, strive as much as possible to be gentle. This will prevent causing any major damage to the radiator or lead to more leakage. Also, remember that a radiator is composed of soft material and any rough handling is likely to cause further damage on the radiator.
Step 2: Turn on the high-wattage soldering iron
As we have mentioned on the tools, ensure that you use a high-wattage soldering iron to do this job. The iron should be attached to a heavy wire as it will be able to support the flow of high current without any risks.
Why not use the low-wattage soldering iron? The answer is simple, they are not capable of producing sufficient heat that is needed to solder the radiator.
Ensure that the high-wattage soldering iron is in good condition before plugging it into an electric outlet. After verifying this, the next step is to switch it on. You simply need to press the button that is on its handle.
Check out the image below of a soldering iron

Image source Amazon
After turning the soldering iron on, give it some minutes to heat up. The time taken will depend on the type of solder iron you are using, and more specifically its wattage. Refer to the manufacturer’s instructions for the expected heating time of the soldering iron.
Has the high-wattage soldering iron attained its desired temperature? Now you are ready to proceed to the next step. But before doing so, place it at its designated holder to avoid causing any accident. This is vital as numerous accident cases have been reported due to poor handling of hot soldering irons.
Step 3: Heat the radiator using a soldering iron
At this point, we are safe to assume that your soldering iron is hot enough to do the job. Heating is part of the soldering process as it prepares the affected area. You simply need to hold the hot soldering iron on the target area of the radiator that you intend to work on.
Continue holding until that part of the radiator is warm enough to accept the solder or wire. Once the target region is warm, start inserting the wire into it. Also, ensure that the cracks are completely filled with enough solder to ensure that there is no leakage after you are done with the job.
Also, remember that when heating ensure that the areas surrounding the targeted region are not affected by the excess heat from the hot soldering iron. This is to avoid causing structural damage which can lead to the leakage of the radiator in the near future.
Also, ensure that you apply the same intensity of heat on the area to be soldered.
Step 4: Apply the radiator soldering flux
This step entails applying an appropriate radiator soldering flux. The main purpose of the flux is to increase the bond between the solder and the radiator. The zinc-free solution is the most preferred when it comes to cleaning the radiator in readiness for the soldering job.
Apply a small amount of the solution to the affected area and ensure that it is evenly spread. You can use a cotton material to apply.
You should also check the recommendations from the manufacturer on the type of solder flux to use on your radiator.
Step 5: Allow the solder to cool
After the above process, give the solder time to cool so that it can solidify. As it does so, it will seal all the possible leaks on the radiator. At this point, we assume that you have turned the heating source off.
Step 6: Grind the radiator to a flat finish
After heating the damaged section of the radiator using a hot soldering iron, the next step will be to grind that portion to a flat finish until it becomes smooth. A steel brush and a small will grind will do this job effectively.
Ensure that the soldered part is devoid of any sharp and rough edges. Remember that the purpose of the grinding is to achieve a smooth surface on the radiator. That portion should be uniform with other sections of the radiator.
Take note that you should be gentle when grinding or smoothening the sections of the radiator to avoid causing damage.
Soldering techniques used for radiators
Are you a professional soldering technician? Chances are you know the methods and tips to use when it comes to repairing radiators. Regardless of your experience, let’s look at some of the radiator soldering techniques that you should use when soldering radiators.
The first one is the soft soldering technique. It is the easiest and cheapest method of soldering radiators. The only downside of this method is low heat resistance. This means that it is not an ideal method for high-pressure solutions.
The high soldering method, on the other hand, has a high heat resistance hence ideal for both low and high-pressure solutions. However, it is slightly more expensive than the soft soldering technique and requires a specialized technician.
So, what kind of solder should I use on the radiator? Experts in the soldering industry recommend the 50/50 ratio of tin to lead.
I hope that the information from this guide will help you solder a radiator safely, easily and successfully.
If you want to find more Electronic Components Distributors, please check out the following articles:
Electronic Components Distributors In the USA
Electronic Components Distributors In UK
Electronic Components Distributors In China
Electronic Components Distributors In India
Electronic Components Distributors In Singapore
Electronic Components Distributors In Malaysia
Electronic Components Distributors In Vietnam
Electronic Components Distributors In South Korea
- Where to buy IC chips? The Best Guide? - March 26, 2024
- Breaking Down Barriers: Overcoming Obstacles in Cross-Border Electronic Component Trade - March 4, 2024
- Everything You Need to Know About Amplifier IC Chips - March 4, 2024


