Last Updated on October 22, 2023 by Kevin Chen
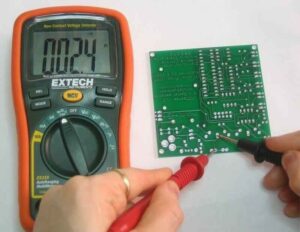
Image source Electroics Hub.org
One of the most feared problems by any electrician is a short circuit. It usually happens when two current conductors in a circuit come into direct contact. When this happens, there will be an unexpected increase of current in the circuit and if not checked it may end up damaging the electronic devices and other components. A short circuit can also cause overheating and even fire. Cases of injuries and even loss of lives have been reported due to short circuit.
To be safe, it is always better to find the short time and put necessary preventive measures. There are various ways of finding a short circuit. In this guide, we are going to discuss how to find a short circuit with a multimeter.
Tools and equipment
Here are the tools and equipment that you will need for this job
- A multimeter for testing and determining continuity of the conductor
- Screwdrivers (flat and star) for accessing the circuit
- Circuit diagram for proper identification of the circuit
- Wire stripper
- Wire cutter
- Safety gear such gloves and safety boots
- Insulation tape for doing the necessary repairs on the circuit
Once you have all the listed tools in place, you can proceed with the process of finding out the short circuit.
Step 1: Turn off the power/unplug the device
This is basically a universal procedure for testing electric circuits. You don’t need to have the circuit on or the device running to find out whether there is a short or not. By using a multimeter, you will still find out even when the circuity is off.
Unplugging the circuit is also a way of protecting yourself from the possible dangers of electric current. Not only does it have the potential of damaging other components in the circuit but can also cause injury.
After turning the circuit off, give the circuit some time to lose its store charges which are also a big hazard.
Step 2: Set the multimeter to the continuity mode
Turn on the multimeter then set it to continuity mode. This mode will help you know whether two points of a conductor are continuous or have a complete connection. The multimeter will produce a beep sound to show that there is a complete connection between these two points.
How do I set the multimeter to continuity mode? Turn the knob of the multimeter to the resistance mode which is usually indicated by the symbol diode symbol or wave symbol. Insert the black lead to the COM jack while the red jack goes to the VΩ jack on the multimeter.
Check out this image below on how to set a digital multimeter to the continuity mode
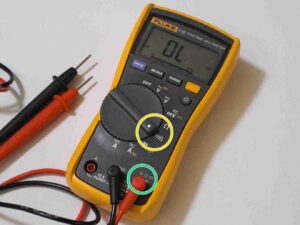
Image source Ifixit
Alternatively, you can set the multimeter to the resistance mode to find a short in the circuit. Here, turn the knob to resistance region of the multimeter and choose the lowest resistance value. You can confirm this mode by touching the probes whereby it should give you zero reading.
Step 3: Connect the probes on the circuit
Now that the multimeter is well-set and calibrated, you can turn your attention to the electric circuit.
First, identify components and conductors that you would like to test for a possible short circuit. Touch one probe at one end of the wire and the other probe at another end of the wire or component on the circuit.
The contact between the probes and the circuit should be perfect. This is vital because poor contact can easily interfere with the multimeter reading.
You should use the same procedure even when you have set the multimeter on the resistance mode.
Step 4: Check the multimeter reading
While the two probes are on the circuit components, take your attention on the multimeter. The multimeter should produce a beeping sound to indicate that the two points of the circuit are connected (continuity detected). This is means that there is a short circuit.
Other than the beeping sound, check the resistance reading on the multimeter. 1 or 0 is an indication of a short circuit.
What if the multimeter does not produce a beeping sound? It means that the two points don’t have a complete connection. Similarly, the resistance reading will be very high. These two results means that there is no short circuit between the two points of the conductors.
Step 5: Isolating the short circuit
From the previous step, you can tell the exact point of a short circuit. The next step entails solving the problem so that the circuit can resume to normal functions.
To do this, simply disconnect all the components between the two points of the short circuit. Do the process sequentially whereby you disconnect one component/wire, test for short, then disconnect the next component.
By the time you are done with the last component, you should have identified the most probable cause of the short circuit. It could be a loosely connected wire or any other electronic component.
If the cause is a bad wire, go ahead to rectify it. For the damaged component, you should proceed to do a replacement. In both cases, buying quality electronic components should be at the top of your priority list.
Step 6: Test the circuit
The last step is all about doing the repair and replacement of the circuit components. Once you are sure about the condition of all the electronic components, you can start putting them back into the circuit.
It will be a smart idea to test for the short circuit every time you add a component. This will save time instead of waiting for all the components to be installed and then testing again.
Once everything is in its right place, you can proceed to test the circuit. Connect it to the power source and turn it on. If you have followed all the steps in this guide, the circuit should work perfectly.
As you can see, it is easy to find a short circuit using a multimeter. In case you encounter serious challenges during the process, it will be prudent to contact a professional electrician.
If you want to find more Electronic Components Distributors, please check out the following articles:
Electronic Components Distributors In the USA
Electronic Components Distributors In UK
Electronic Components Distributors In China
Electronic Components Distributors In India
Electronic Components Distributors In Singapore
Electronic Components Distributors In Malaysia
Electronic Components Distributors In Vietnam
Electronic Components Distributors In South Korea
- The Ultimate Guide to IRFZ44N MOSFET - April 30, 2024
- AMD Ryzen 5 vs Intel i5: How to Choose the Right Processor? - April 30, 2024
- Where to buy IC chips? The Best Guide? - March 26, 2024