Last Updated on October 22, 2023 by Kevin Chen
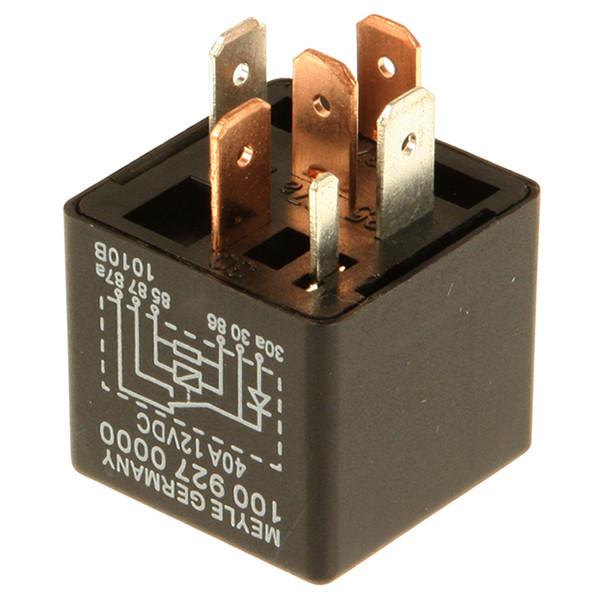
Image source Europa parts
Do you have a 5-pin relay and you are wondering how to wire it? Wiring this relay is not a complex procedure. Once you know the basics of relays, you will be able to wire it without any issues.
A 5-pin relay is basically a type of electrical switch whose working mechanism is controlled by an electromagnetic force. It is called a 5-pin because it has five contacts that link the power source to the target load.
So, what are the 5-pin relays used for? The main function of this relay is to control the switching operation in an electric circuit. This is a feature that separates it from the normal 4-pin relay.
How does it determine the switching action?
Well, when you apply some voltage to the relay, it will create a magnetic force that will pull the contacts. The movements of the contacts will determine whether the switch remains closed or open.
5-pin relays are commonly used in automotive applications where they determine the operations of devices such as lights, audio systems, and air conditioners. You are also likely to find them in industrial and home appliances.
Steps of Wiring 5-Pin Relay
Now let’s discuss the steps of wiring a 5-pin relay.
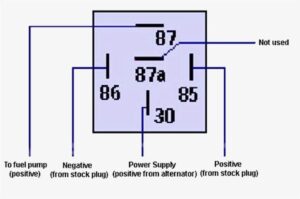
Image source Pintrest
Step 1: Identify the pins and their numbers
You cannot proceed with the wiring if you don’t know the specs of the pins. A typical 5-pin relay comprises of five pins labeled as follows:
- Pin 30 -Common contact: Usually, power source is connected to this pin through an electric fuse
- Pin 87a-Normally closed pin: When the switch is off power will be directed from the relay through this pin
- Pin 87-Normally open pin
- Pin 86-Coil power -This is jumped from the pin 30 and also allows power to pass through
- Pin 85-Coil ground- This pin allows the grounding of the relay
Step 2: Connect the coil
The coil is at the heart of the 5-pin relay. It controls the whole switching action. It does this by pulling and releasing the contacts together.
So, in this step of wiring, you will connect to the two coil pins which are labelled 85 and 86. To do this connection, you will have link one end of the wire to the pin 85. This pin usually serves as the ground terminal of the coil. You will connect the other end to the ground of the main circuit.
For the pin 86 you will connect the second wire to this pin Remember that pin 86 usually serves as the power terminal of the coil. This means that the other end of the wire that connects to this pin will be connected to the power source.
Step 3: Connect the load to the common contact
This step entails connecting the device that you would like to control to the common contact pin of the relay. This is the pin labelled 30 and is positioned right at the center or middle of other pins.
Before you make the connection, decide the specific wire of the device that you would want to connect to the contact pin. One end of the wire should be to the load and the other one to pin 30. Ensure that the pin is well-secured.
Step 4: Connect pin 87 (Normally Open)
In this step, we will connect the Normally Open pin of the 5-pin relay to the device that you would like to control. First, you will have to identify the exact position of this terminal which is next to the common contact.
The next step is to identify the positive terminal of the device that you want to control. This terminal is usually labeled or you can use a manufacturer’s datasheet to confirm this.
Connect one end of the wire to the positive terminal of the load and the other end to pin 87 of the 5-pin relay. Like in the other steps, ensure that the connection is well-secured.
Step 5: Connect the load to the pin 87a
The Normally Closed pin (87a) will ensure that your load remains in an OFF state even when the relay is in ON state.
To do this connection, you first have to decide the configuration of the device: would you like it to be OFF when the relay is ON or would you like the device to ON when the relay is activated?
Once you decide on the configuration, you can connect the relay to either positive or negative terminal of the device
After you are done with the wiring proceed to test it using your load.
Precautions to take when wiring 5-pin relay
Even after taking the steps that we have discussed in this guide, there are numerous precautions that you should take. They include the following:
- Use the correct wire gauge: Al the wires that we are using for the wiring should match the current needs of the circuit. They should be of the right capacity to support the smooth flow of electric current.
- Know the voltage and the current rating of the circuit: This will help you choose the right wire gauge and even the pin relay. High power through the circuit may end up blowing the switch relay
- Consult the datasheet from the 5-pin relay manufacturer. This will always be a backup for you to avoid making any mistakes when wiring the relay. The sheet will also give you all the technical specifications that you should know about a particular 5-pin relay.
Conclusion
Now that you know how to wire to a 5-pin relay, what next? You are free to allow the relay to perform its role in whichever application area that it is designed for. Whether it is in the automotive, home appliance or any other personal project that you are working on.
In all the steps that we have outlined, ensure that you use high-quality electronic components, whether it is wires or the relay itself. Quality components will always guarantee safety and deliver the best results.
And if you are not sure of what to do in any of the steps that we have described, it will be good to seek professional help. A professional electrician will be able to do the best job.
If you want to find more Electronic Components Distributors, please check out the following articles:
Electronic Components Distributors In the USA
Electronic Components Distributors In UK
Electronic Components Distributors In China
Electronic Components Distributors In India
Electronic Components Distributors In Singapore
Electronic Components Distributors In Malaysia
Electronic Components Distributors In Vietnam
Electronic Components Distributors In South Korea
- The Ultimate Guide to IRFZ44N MOSFET - April 30, 2024
- AMD Ryzen 5 vs Intel i5: How to Choose the Right Processor? - April 30, 2024
- Where to buy IC chips? The Best Guide? - March 26, 2024